

My First Turtle Brownie Fumble
Let me tell you about my first try at these brownies. I was so excited. I poured the caramel on right when the pan came out of the oven. Big mistake! The caramel just melted and disappeared into the brownie. It made a gooey mess. I still laugh at that.
That’s why we cool the brownies first now. Patience makes the perfect caramel layer. This matters because cooking teaches us little lessons. Sometimes, waiting makes things much better. Have you ever had a kitchen mistake turn into a good lesson?
Why These Ingredients Are Friends
This recipe is like a party. Every guest brings something special. The cocoa makes it deep and chocolatey. The pecans add a happy crunch. The caramel brings sweet, sticky joy.
Melting the butter with the sugar is a magic step. It helps make that shiny, crackly top we all love. Doesn’t that smell amazing when you mix it? Fun fact: That shiny top is called a “flaky crust” by bakers. Using room-temperature eggs matters too. They mix in smoothly for a better batter.
The Secret is in the Folding
After you add the flour, just mix until you can’t see it. Then, put the mixer away. Use a spatula for the chips and nuts. We “fold” them in gently.
This keeps the brownies tender. If you beat it too much, they get tough. Think of it as tucking the goodies into bed. Which add-in do you like best—chocolate chips, nuts, or caramel?
Waiting for the Perfect Bite
The baking time is important. You want a few crumbs on your toothpick. Not wet batter, just a few crumbs. That means they are fudgy, not dry. Let them cool in the pan.
This is the hardest part! Then, add your caramel and toppings. The fridge step is your friend. It makes the caramel set so you can cut clean squares. What’s your favorite way to eat a brownie—warm, cold, or with ice cream?
More Than Just a Treat
Food is about sharing. I made these for my grandson’s team last week. Their smiles were the best part. Making something with your hands for others is a special feeling.
This matters because these little acts of care connect us. A shared brownie can turn a regular day into a sweet memory. What’s the last thing you baked or cooked to share with someone?
Ingredients:
| Ingredient | Amount | Notes |
|---|---|---|
| large eggs | 4 | room temperature |
| vanilla extract | 2 teaspoons | |
| unsweetened cocoa powder | 1 cup | |
| salt | 1 teaspoon | |
| baking powder | 1 teaspoon | |
| unsalted butter | 1 cup | |
| granulated sugar | 2 ½ cups | |
| all-purpose flour | 1 ¼ cups | |
| semi-sweet chocolate chips | 1 ½ cups | divided into 1 cup and ½ cup |
| chopped pecans | 1 ½ cups | divided into 1 cup and ½ cup |
| caramel sauce | 1 cup |
My Famous Turtle Brownies: A Sweet Story in Every Bite
Hello, my dear! Come sit at the counter. Let’s bake my famous turtle brownies. They are rich, gooey, and full of happy memories. I first made these for my grandson’s tenth birthday. He still asks for them every year. Doesn’t that smell amazing?
We’ll mix chocolate, caramel, and pecans. It’s like a party in a pan. I love how simple it is. You just need a big bowl and a happy heart. Are you ready? Let’s begin our sweet adventure together.
Step 1
First, warm up your oven to 350°F. Grease your trusty 9×13 pan. I always line mine with parchment paper. It makes lifting the brownies out so easy later. (My hard-learned tip: Use a glass dish if you can. It bakes things so evenly!). Set your pan aside for now.
Step 2
Crack four eggs into your mixer bowl. Add two teaspoons of vanilla. Whisk them together for a minute or two. You want them light and frothy. I still laugh at how I used to whisk by hand. My arm would get so tired! Your mixer is a wonderful helper.
Step 3
Now, add the cocoa, salt, and baking powder. Whisk it all for another minute. Scrape the bottom with a spatula. We don’t want any dry pockets hiding down there. Meanwhile, melt your butter in a big bowl. Be careful, it gets hot!
Step 4
Pour the sugar into that hot, melted butter. Whisk it right away. It will look a little like wet sand. This step creates a fudgy texture. Now, pour this sweet butter mix into your egg mixture. Mix until it’s all one beautiful, dark batter.
Step 5
Sprinkle in the flour. Mix just until you don’t see white powder anymore. Too much mixing makes tough brownies. Now, the fun part! Fold in one cup of chocolate chips and one cup of pecans. The batter will be thick and glorious. Do you fold or stir? Share below!
Step 6
Spread that batter into your waiting pan. Use your spatula to make it even. Bake for 30 to 35 minutes. A toothpick should have just a few crumbs when it’s done. Let them cool almost completely. This takes patience, I know!
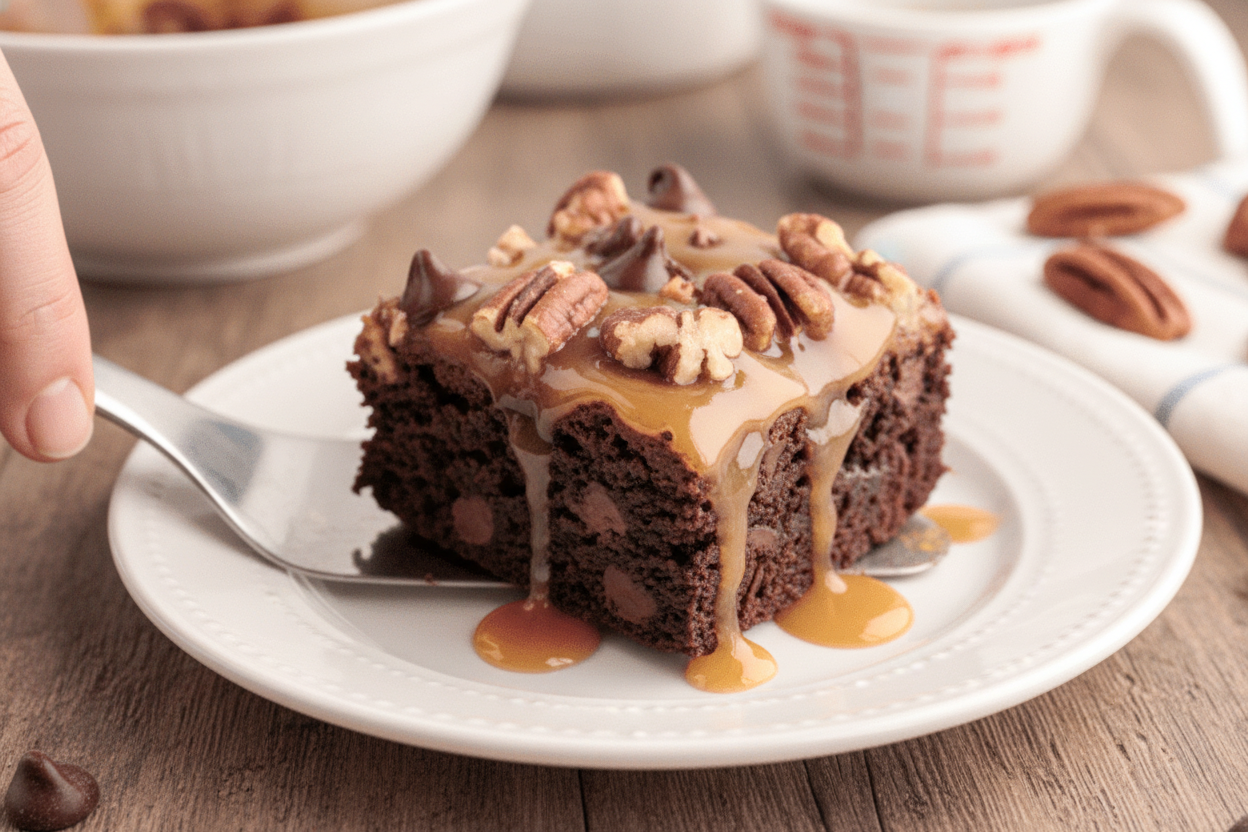
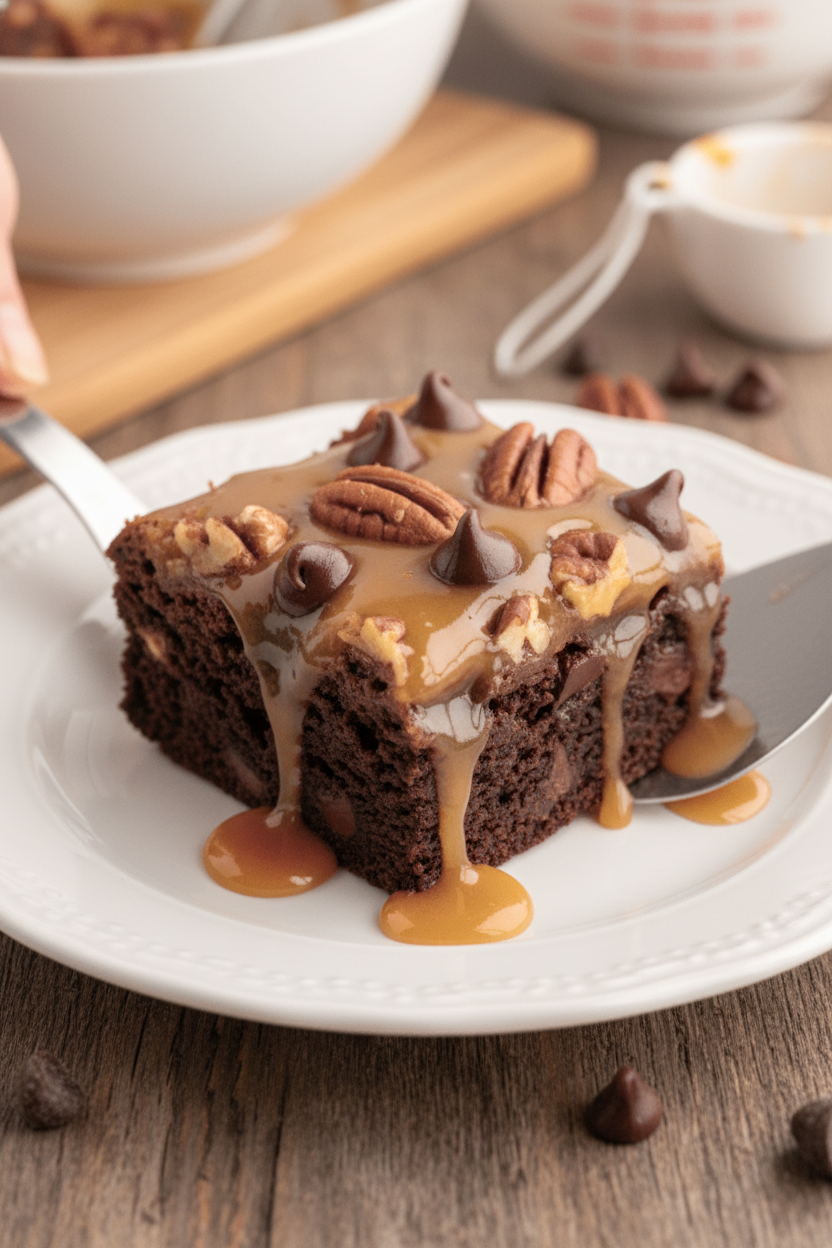
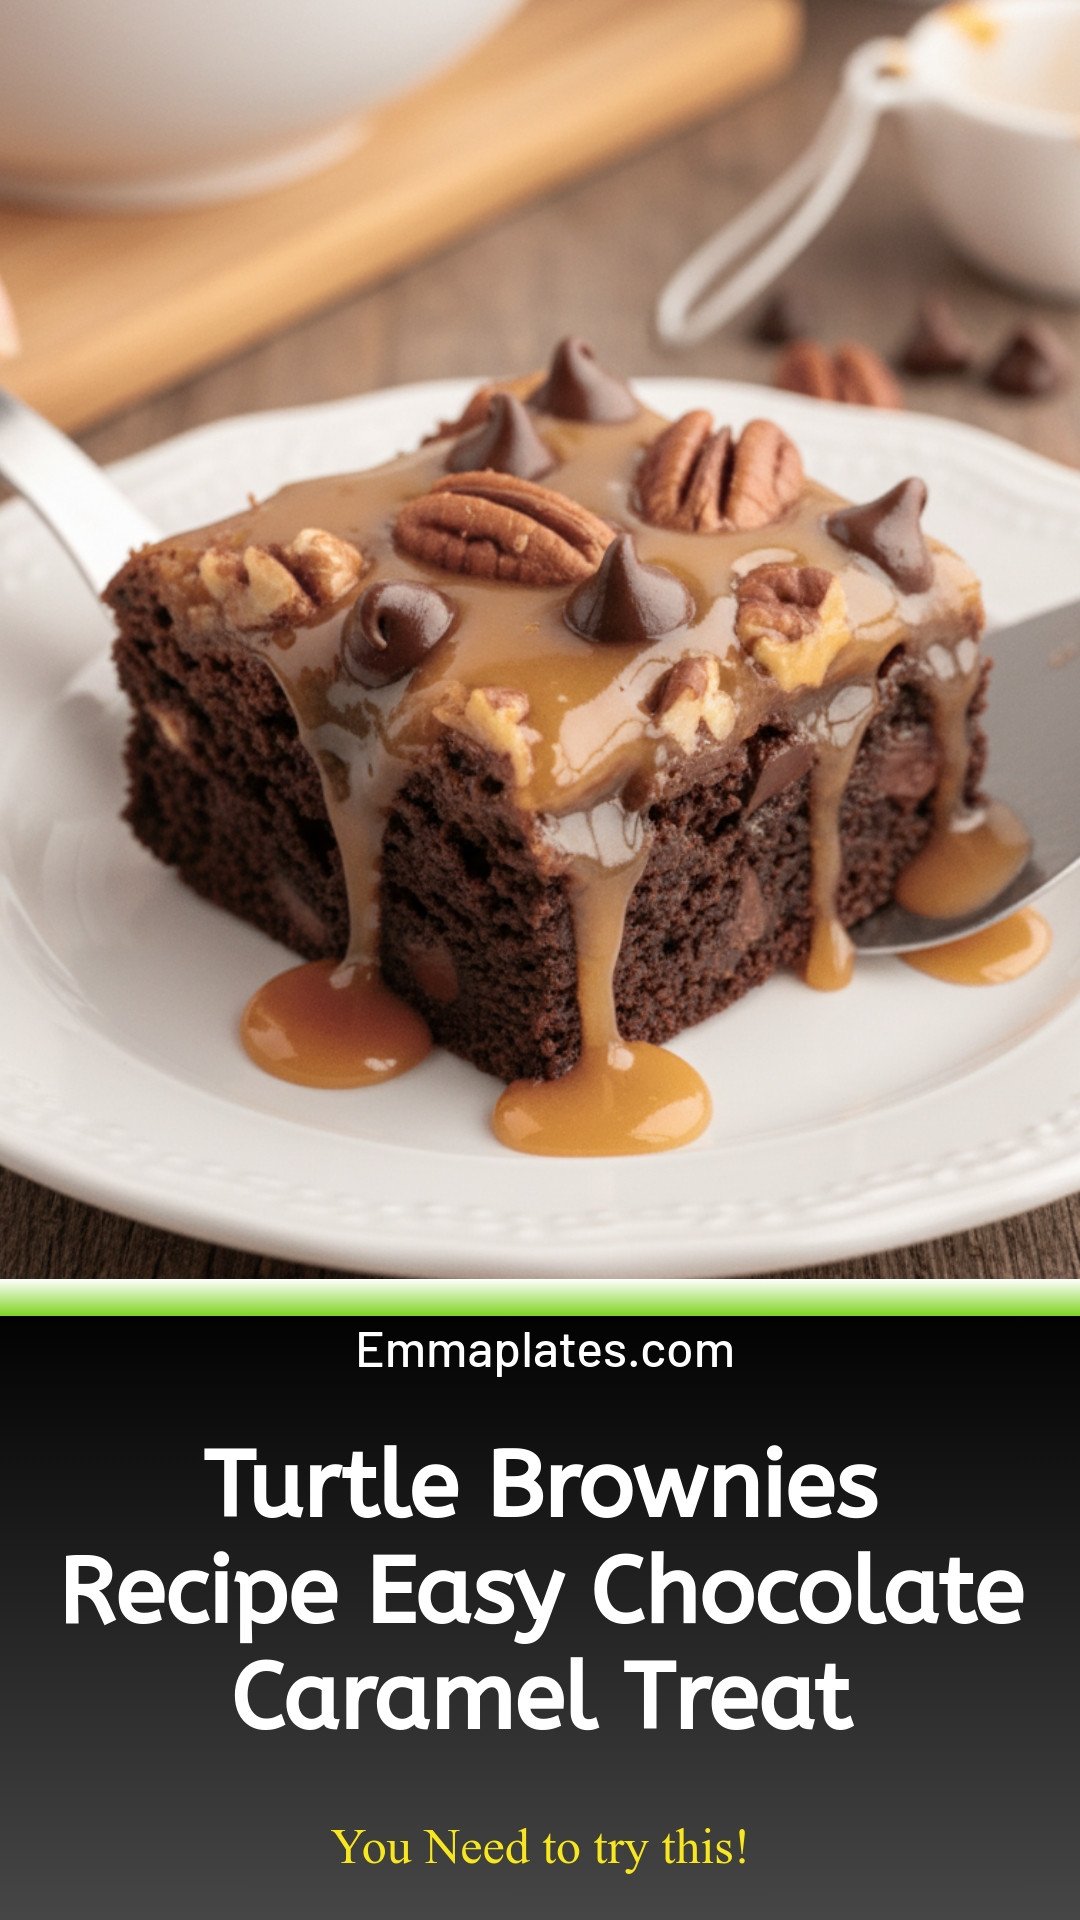
Step 7
Here comes the magic. Gently spread caramel sauce over the top. Sprinkle on the rest of the chips and pecans. Now, pop the whole pan in the fridge. This hardens the caramel so you can slice it. Finally, lift out the brownies and cut into squares. Enjoy your masterpiece!
Cook Time: 35 minutes
Total Time: 1 hour 15 minutes (plus cooling)
Yield: 24 rich brownies
Category: Dessert, Baking
Three Tasty Twists on a Classic
Once you master the classic, try a little twist! It’s fun to play with flavors. Here are three of my favorite ideas. They each tell a different story.
Salty-Sweet Surprise
Use salted caramel sauce. Then, sprinkle a little sea salt on top with the pecans. It makes the chocolate taste even deeper.
Berry Bliss
Skip the caramel. Swirl one cup of raspberry jam into the batter before baking. Top with white chocolate chips instead.
Cookie Dough Dream
After adding the caramel, drop small spoonfuls of edible cookie dough on top. Then add your pecans and chips. It’s a double treat!
Which one would you try first? Comment below!
Serving Your Sweet Creation
These brownies are wonderful all on their own. But sometimes, you want to make them extra special. For a fancy plate, add a dollop of whipped cream. A few fresh raspberries look pretty beside it, too. It feels like a cafe dessert right at home.
What to drink? A cold glass of milk is always the perfect partner. For the grown-ups, a small glass of tawny port wine is lovely. It sips like liquid raisins and nuts. Which would you choose tonight?
Keeping Your Turtle Brownies Perfect
Let’s talk about keeping these treats yummy. First, let them cool completely. Then, slice them into squares. Store them in a sealed container. They will stay fresh on the counter for three days.
For longer storage, use your fridge or freezer. Layer them with parchment paper in a container. They freeze beautifully for up to three months. I once forgot a batch in my freezer for weeks. It was a happy surprise later!
Thaw frozen brownies on the counter. Want a warm bite? Pop one in the microwave for 15 seconds. This little bit of planning means you always have a sweet treat ready. It turns baking from a chore into a gift for your future self. Have you ever tried storing it this way? Share below!
Simple Fixes for Common Brownie Troubles
Even grandmas have kitchen mishaps. I remember when my brownies turned out cakey. The issue was over-mixing the flour. Mix just until you see no white streaks. This keeps them fudgy and dense.
Another problem is a hard, cracked top. This often means the oven was too hot. Use an oven thermometer to check. An accurate temperature gives you that perfect, shiny crust.
Is your caramel sauce sliding off? Let the brownies cool almost completely first. A warm brownie will melt the caramel. Patience here makes a pretty, neat layer. Getting these details right builds your confidence. It also makes the flavor and texture just perfect. Which of these problems have you run into before?
Your Turtle Brownie Questions, Answered
Q: Can I make these gluten-free? A: Yes! Use a good gluten-free flour blend. I like the ones with xanthan gum already in them.
Q: Can I make them ahead? A: Absolutely. Bake them a day before. Add the caramel topping the day you serve them.
Q: What if I don’t have pecans? A: Walnuts are a fine swap. Or, leave nuts out for a pure chocolate-caramel bite.
Q: Can I halve the recipe? A: You can. Use an 8×8 inch pan. Just watch the baking time—it may be less.
Q: Any optional tips? A: A pinch of sea salt on top is lovely. Fun fact: Salt makes sweet flavors taste even sweeter! Which tip will you try first?
From My Kitchen to Yours
I hope you love making these brownies. Baking is about sharing joy and making memories. I still make these with my grandkids. The kitchen gets wonderfully messy.
I would love to see your creations. Did you add a special twist? Your photos inspire our whole cooking community. Have you tried this recipe? Tag us on Pinterest! Thank you for baking with me today.
Happy cooking!
—Emma Caldwell.
Turtle Brownies: Turtle Brownies Recipe Easy Chocolate Caramel Treat
Description
Decadent turtle brownies with gooey caramel, crunchy pecans & rich chocolate. The ultimate easy dessert recipe for any occasion!
Ingredients
Instructions
- Preheat the oven to 350°F. Grease a 9×13-inch glass baking dish and line it with parchment paper. Set aside.
- In the bowl of a stand mixer, combine eggs and vanilla extract. Using the whisk attachment on the mixer, whisk the egg mixture for 1 to 2 minutes.
- Add the cocoa powder, salt, and baking powder to the mixture and whisk for an additional minute, scraping the bottom of the bowl with a rubber spatula.
- Meanwhile, in a large bowl, melt the butter in the microwave. Once melted, whisk the sugar into the hot butter.
- Add the hot butter/sugar mixture to the stand mixer bowl and mix until combined.
- Add the flour to the batter, mixing just until fully combined.
- Fold in 1 cup of chocolate chips and 1 cup of roughly chopped pecans.
- Spread the brownie batter into the prepared baking dish.
- Bake for 30 to 35 minutes, until just a few crumbs cling to a toothpick/knife when stuck in the center of the brownies. Remove from the oven and allow to cool most of the way.
- Spread the caramel sauce over the top of the brownies. Sprinkle with the remaining chocolate chips and chopped pecans.
- Place the pan of brownies in the refrigerator or freezer until the caramel has hardened across the top.
- Lift the brownies from the pan and slice them into squares.
Notes
- For clean slices, use a sharp knife and wipe it clean between cuts. Store in an airtight container at room temperature for up to 3 days.


Leave a Reply