

My First Bloomin’ Onion
I tried making this years ago. I was so nervous. My hands were shaking a little.
I thought I would cut the onion all apart. But the root held it together. It felt like magic. I still laugh at that. Have you ever tried a recipe that made you nervous first?
Why The Root Matters
Do not cut off the root. This is the most important step. It is the onion’s anchor.
It keeps all the petals connected. This lets you spread them out like a flower. It matters because food should be fun to make and to look at. A little structure makes the fun possible.
The Coating Secret
You must get flour in all the cracks. Use your fingers gently. Then the egg wash, then flour again.
This double coat is the trick. It makes every petal crispy. *Fun fact: The smoked paprika gives it that warm, cozy color. Doesn’t that smell amazing when it cooks?
To Sauce or Not to Sauce
The sauce is simple. Just stir a few things in a bowl. I like a little kick from the horseradish.
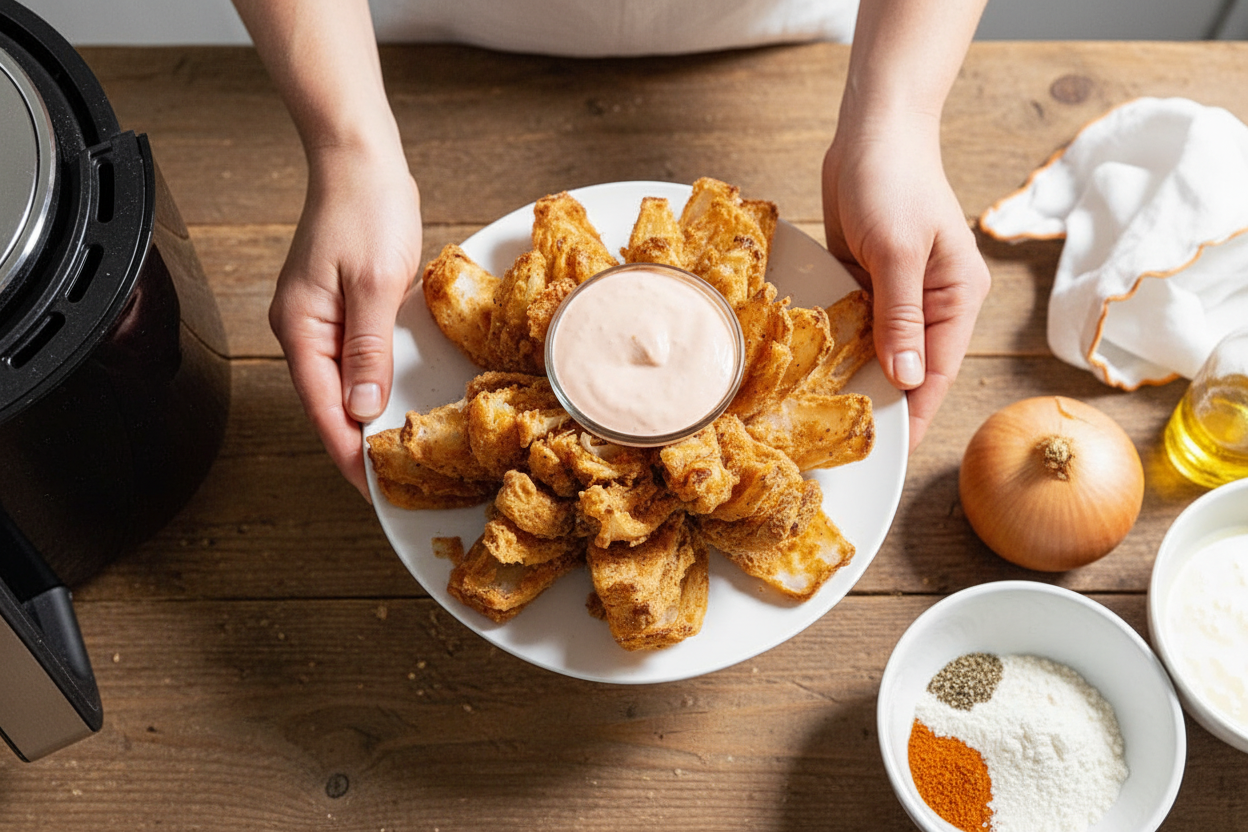
But you can skip it. The onion is great alone. My grandson loves it with ketchup. What is your favorite dip for crispy foods? Tell me, I’d love to know.
A Lighter Way to Enjoy
We love fried food. But our bodies don’t always love it back. This is why I like the air fryer.
A little spray oil does the job. You get that wonderful crunch without a pot of hot oil. It matters to find these little swaps. We can keep our traditions and feel good too.
Your Turn to Try
This recipe is a show-stopper. It looks fancy but is just simple steps. Perfect for a family movie night.
Will you try it this weekend? If you do, share a picture with me. I want to see your kitchen creation. What other fun foods should we try in the air fryer?
Ingredients:
| Ingredient | Amount | Notes |
|---|---|---|
| Vidalia onion | 1 large | |
| All-purpose flour | 1/2 cup | Can use gluten-free |
| Garlic powder | 1 teaspoon | |
| Smoked paprika | 1 teaspoon | |
| Salt | 1/2 teaspoon | |
| Black pepper | 1/2 teaspoon | |
| Cayenne | 1/2 teaspoon | |
| Milk | 1/2 cup (120 mL) | Can use unflavored dairy-free milk |
| Egg | 1 large | |
| Sprayable cooking oil | As needed | |
| Mayonnaise | 1/4 cup | For optional sauce |
| Creamy horseradish sauce | 2 tablespoons | For optional sauce |
| Ketchup | 1 tablespoon | For optional sauce |
| Salt and pepper | To taste | For optional sauce |
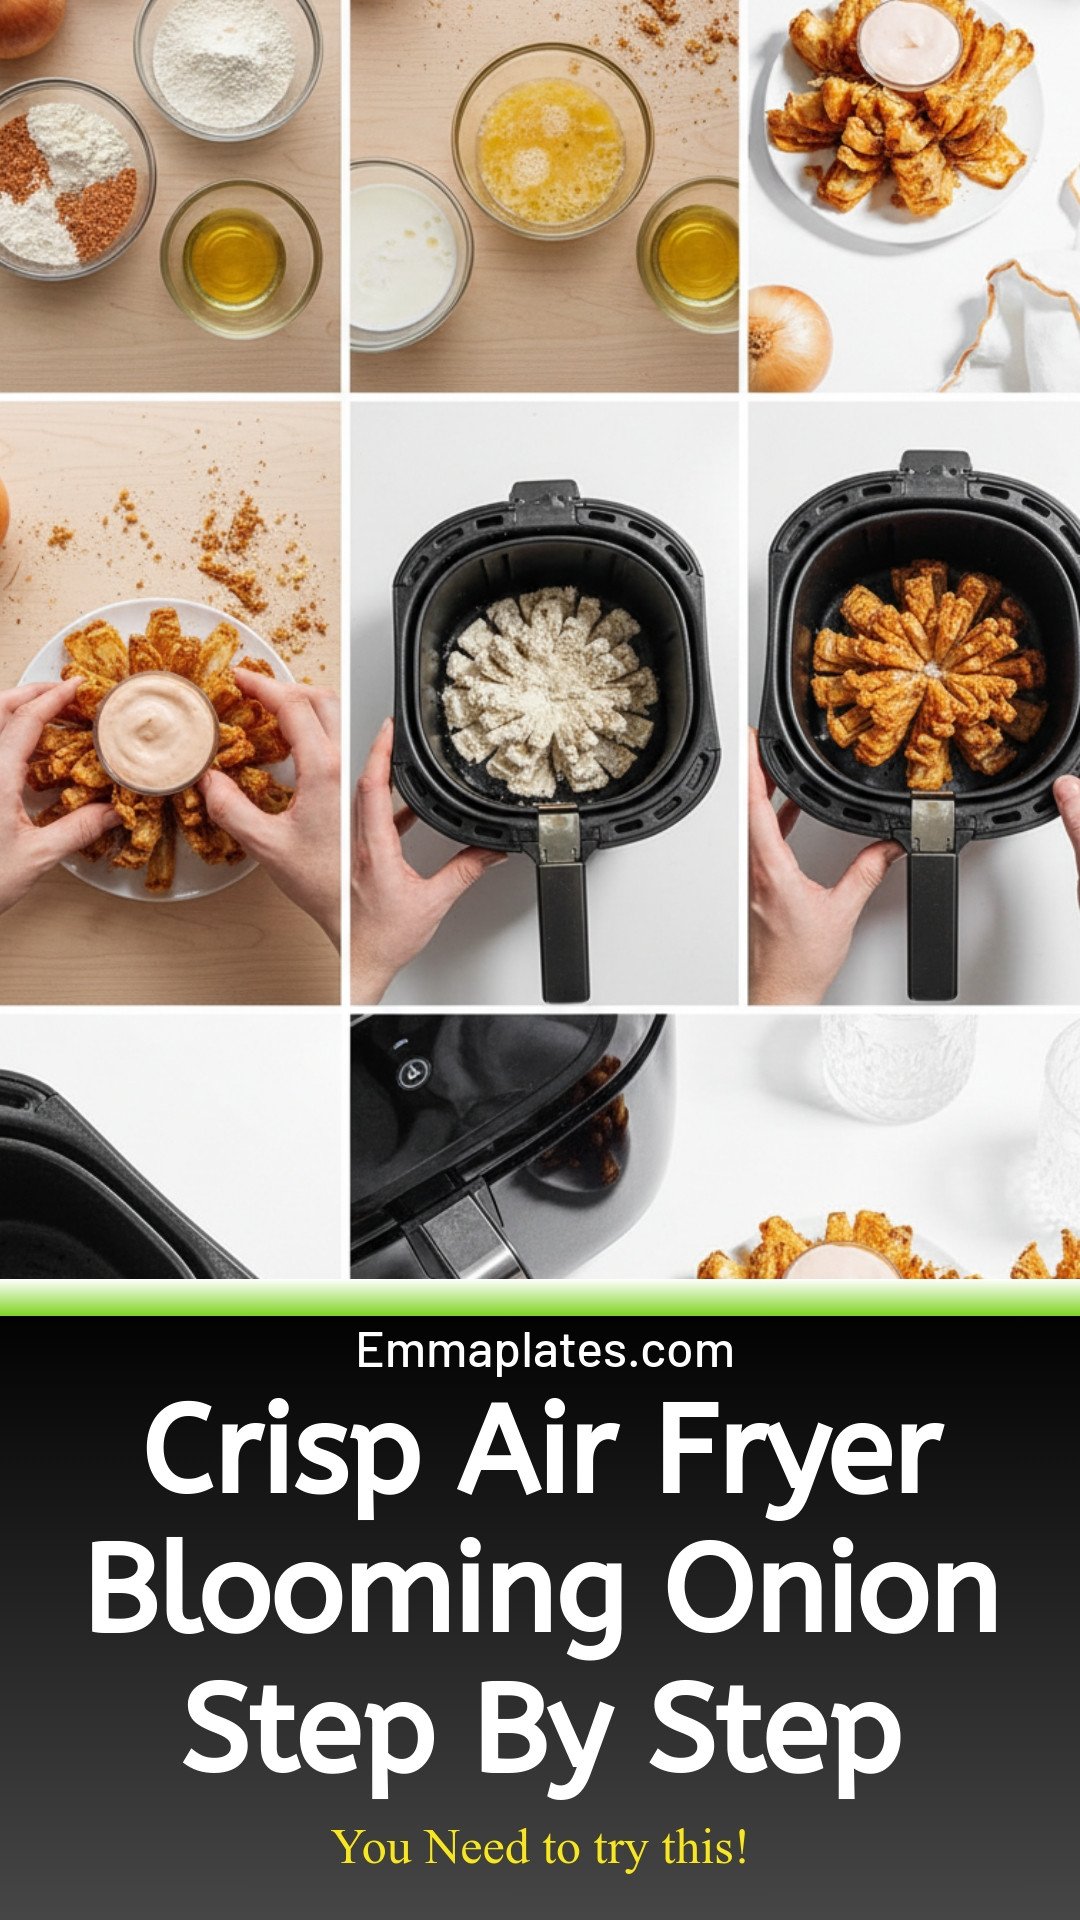
How to Make a Crispy Air Fryer Blooming Onion
Hello, my dear! It’s Emma. Let’s make some fun kitchen magic today. This blooming onion always reminds me of my grandson’s wide eyes. He calls it a “flower you can eat.” Isn’t that sweet? It’s easier than you think, and your air fryer does the hard work. Just follow these simple steps with me.
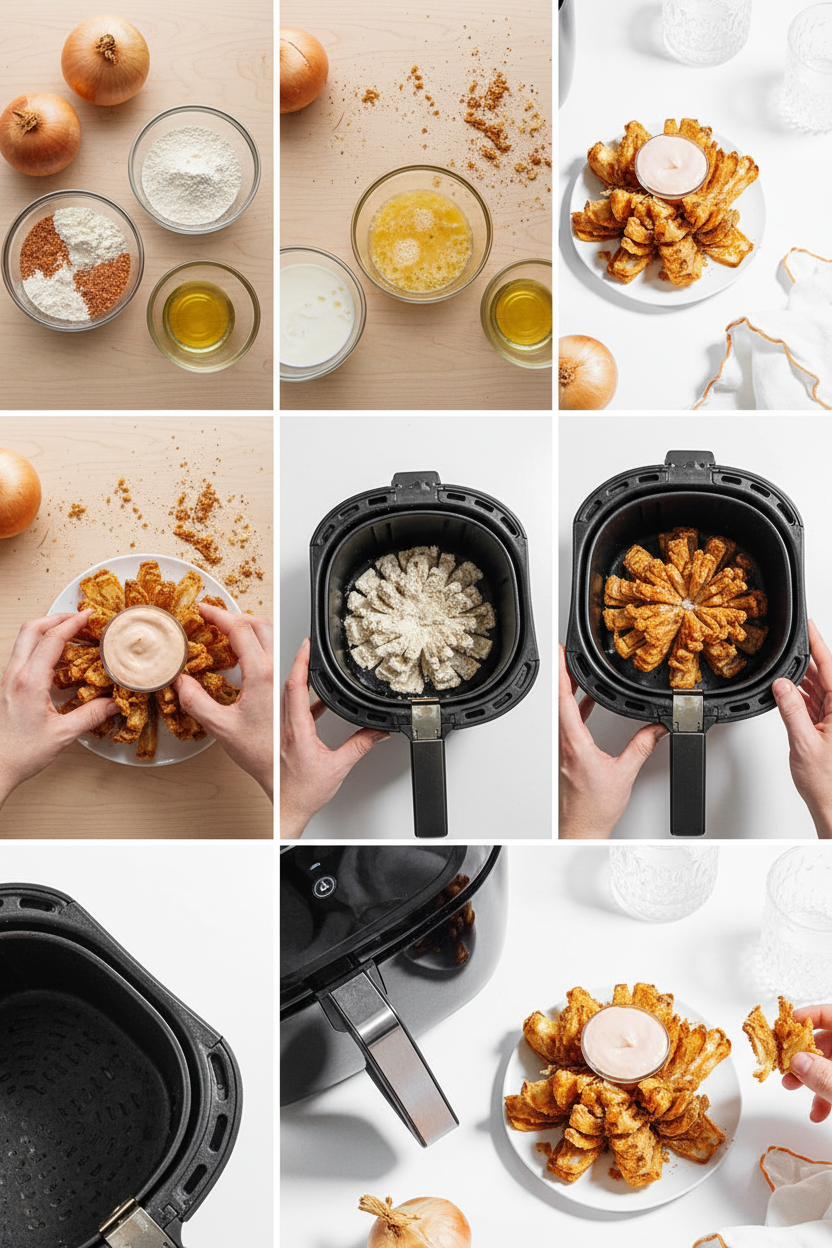
- Prepare the onion: First, we prepare our onion. Cut off just the top, but leave the hairy root end alone. That root is our handle. Peel off the papery brown skin. Now, make four cuts down into the onion, like you’re slicing it into quarters. Stop before you hit the root! Gently spread the sections apart. It looks like a flower already. (My hard-learned tip: a sharp knife makes this much safer and easier.)
- Make the coating stations: Let’s make our coating stations. In one bowl, mix the flour and all those lovely spices. Smell that paprika and garlic? In another bowl, whisk the milk and egg together until smooth. I still laugh at the time I used the wrong bowl. What’s your favorite spice smell? Share below!
- Coat the onion: Time to dress our onion! Place it gently into the flour bowl. Dust it all over, even in the cracks. Tap off the extra. Now, give it a good dunk in the egg mixture. Let it drip for a second. Finally, place it back in the flour. Really get that seasoned flour into every little petal.
- The crispy secret: This is the crispy secret. Spray your onion with cooking oil. Get every nook and cranny! This makes it turn golden and delicious. Doesn’t that smell amazing already? Carefully place it in your air fryer basket. The root should be facing down.
- Cook and serve: Let it cook at 300°F for about 15-20 minutes. You’ll know it’s done when it’s crispy and brown. While it cooks, stir the sauce ingredients together. That’s it! Serve your masterpiece hot. Be careful, it’s very warm inside.
Cook Time: 15–20 minutes
Total Time: 30 minutes
Yield: 2–4 servings
Category: Appetizer, Snack
Three Fun Twists to Try
Once you master the basic recipe, you can play! Here are three of my favorite ideas. They make it feel like a whole new treat every time.
- Cheesy Bloom: Sprinkle grated parmesan into the flour mix. It gets so golden and savory.
- Everything Bagel Style: After spraying with oil, press on some everything bagel seasoning. So crunchy!
- Sweet & Smoky: Swap the paprika for a bit of brown sugar and cinnamon. It’s surprising and good.
Which one would you try first? Comment below!
Serving It Up Just Right
This onion is a star on its own. But I love making a little plate. Place it on a big platter for everyone to share. Add some carrot sticks and celery for dipping, too. It makes a fun meal with simple sliders or grilled chicken strips.
For drinks, a cold root beer or creamy vanilla milkshake is perfect. For the grown-ups, a chilled lager beer pairs wonderfully. It cuts right through the richness. Which would you choose tonight?
Keeping Your Blooming Onion Crispy
Let’s talk about keeping that onion crispy. You must eat it right away for the best crunch. If you have leftovers, store them in the fridge. Just put them in a sealed container. They will lose their crisp, but will still taste good.
I do not recommend freezing it. The texture becomes too soft. You can make the flour mix ahead, though. Keep it in a jar for a quick meal later. This saves so much time on a busy night.
I remember my first one. I tried to save half for later. It was soggy, but my grandson still ate it happily! Storing smart means less waste and more happy tummies. Have you ever tried storing it this way? Share below!
Fixes for Common Blooming Onion Troubles
Sometimes the petals break. Do not cut all the way through the root. That root is the onion’s anchor. A sharp knife helps make clean cuts. I once used a dull knife and made a mess!
The coating might not stick. Pat your onion dry first. Then really work the flour into every crack. This step matters. It gives every bite a delicious, crispy shell.
It might not cook evenly. Do not overcrowd your air fryer. Give the onion plenty of room. Spraying oil well makes it brown nicely. Fixing small issues builds your cooking confidence. Which of these problems have you run into before?
Your Quick Questions, Answered
Q: Can I make this gluten-free? A: Yes! Just use your favorite gluten-free flour blend. It works perfectly.
Q: Can I prepare it ahead? A: You can coat the onion. Keep it in the fridge for an hour before cooking.
Q: What if I don’t have paprika? A: Try a little chili powder instead. It will still be tasty.
Q: Can I make a smaller one? A: Of course! Use a medium onion. The cooking time may be less.
Q: Is the sauce needed? A: No, but it’s a fun dip. *Fun fact: The sauce is my take on a classic steakhouse dip!* Which tip will you try first?
From My Kitchen to Yours
I hope you love making this fun recipe. It is a joy to share food with family. Seeing that golden onion bloom always brings smiles.
I would love to see your creation. Share a picture of your kitchen adventure. It makes my day to see your results. Have you tried this recipe? Tag us on Pinterest!
Happy cooking!
—Emma Caldwell.
Crisp Air Fryer Blooming Onion Recipe (Step-By-Step): Crisp Air Fryer Blooming Onion Step By Step
Description
Crispy, golden, and easier than deep-frying! Our step-by-step air fryer blooming onion recipe delivers that iconic appetizer with less oil and mess.
Ingredients
Sauce (optional):
Instructions
- Cut Onion: Cut off the top of the onion, leaving the root intact (it will hold the onion together). Peel the skin off the onion. Make 4 vertical cuts into the onion, starting from the top and working towards the root end, ensuring you don’t cut all the way through the root. Gently spread apart the onion petals with your fingers to expose the layers and give it the bloomin’ appearance. Be careful not to break the petals off.
- Prep Dredging Station: In a large bowl, combine the flour and all spices. In a separate bowl, whisk together the milk and egg.
- Bread The Onion: Gently place your onion in the flour bowl, lightly dusting it with the mixture. Tap off excess, then dunk it in the egg to completely coat it. Let excess drip off, then place it back in the flour mixture. Work flour into all the crevices.
- Oil It: Use a sprayable cooking oil to coat the whole onion lightly (and all of its nooks and crannies) in oil—this will make it brown and crispy.
- Air Fry: Cook the onion in the air fryer at 300°F (150°C) for 15 to 20 minutes until golden brown and crispy.
- Sauce (optional): While the onion cooks, stir together the sauce.
- Serve: Serve hot with sauce!
Notes
- Nutrition (per 1 serving without sauce): Calories: 137kcal | Carbohydrates: 17.5g | Protein: 4.7g | Fat: 5.5g | Saturated Fat: 1.3g | Cholesterol: 49mg | Sodium: 325mg | Potassium: 114mg | Fiber: 1.3g | Sugar: 3.3g | Calcium: 55mg | Iron: 1mg


Leave a Reply