
Why This Dessert Stole My Heart
I first made this dessert for a summer picnic. My youngest grandson, Timmy, took one bite and declared it the best thing Id ever made. I still laugh at that. This is a no-bake wonder. That means you dont turn on the oven on a hot day. It also means little hands can help with almost every step. Doesnt that sound nice? Here is why this matters: When kids help in the kitchen, they feel proud of what they make. And when you dont have to bake, you can spend that time laughing together instead of sweating over a hot stove. Have you ever made a no-bake dessert with your family? What was it?The Crust That Holds It All
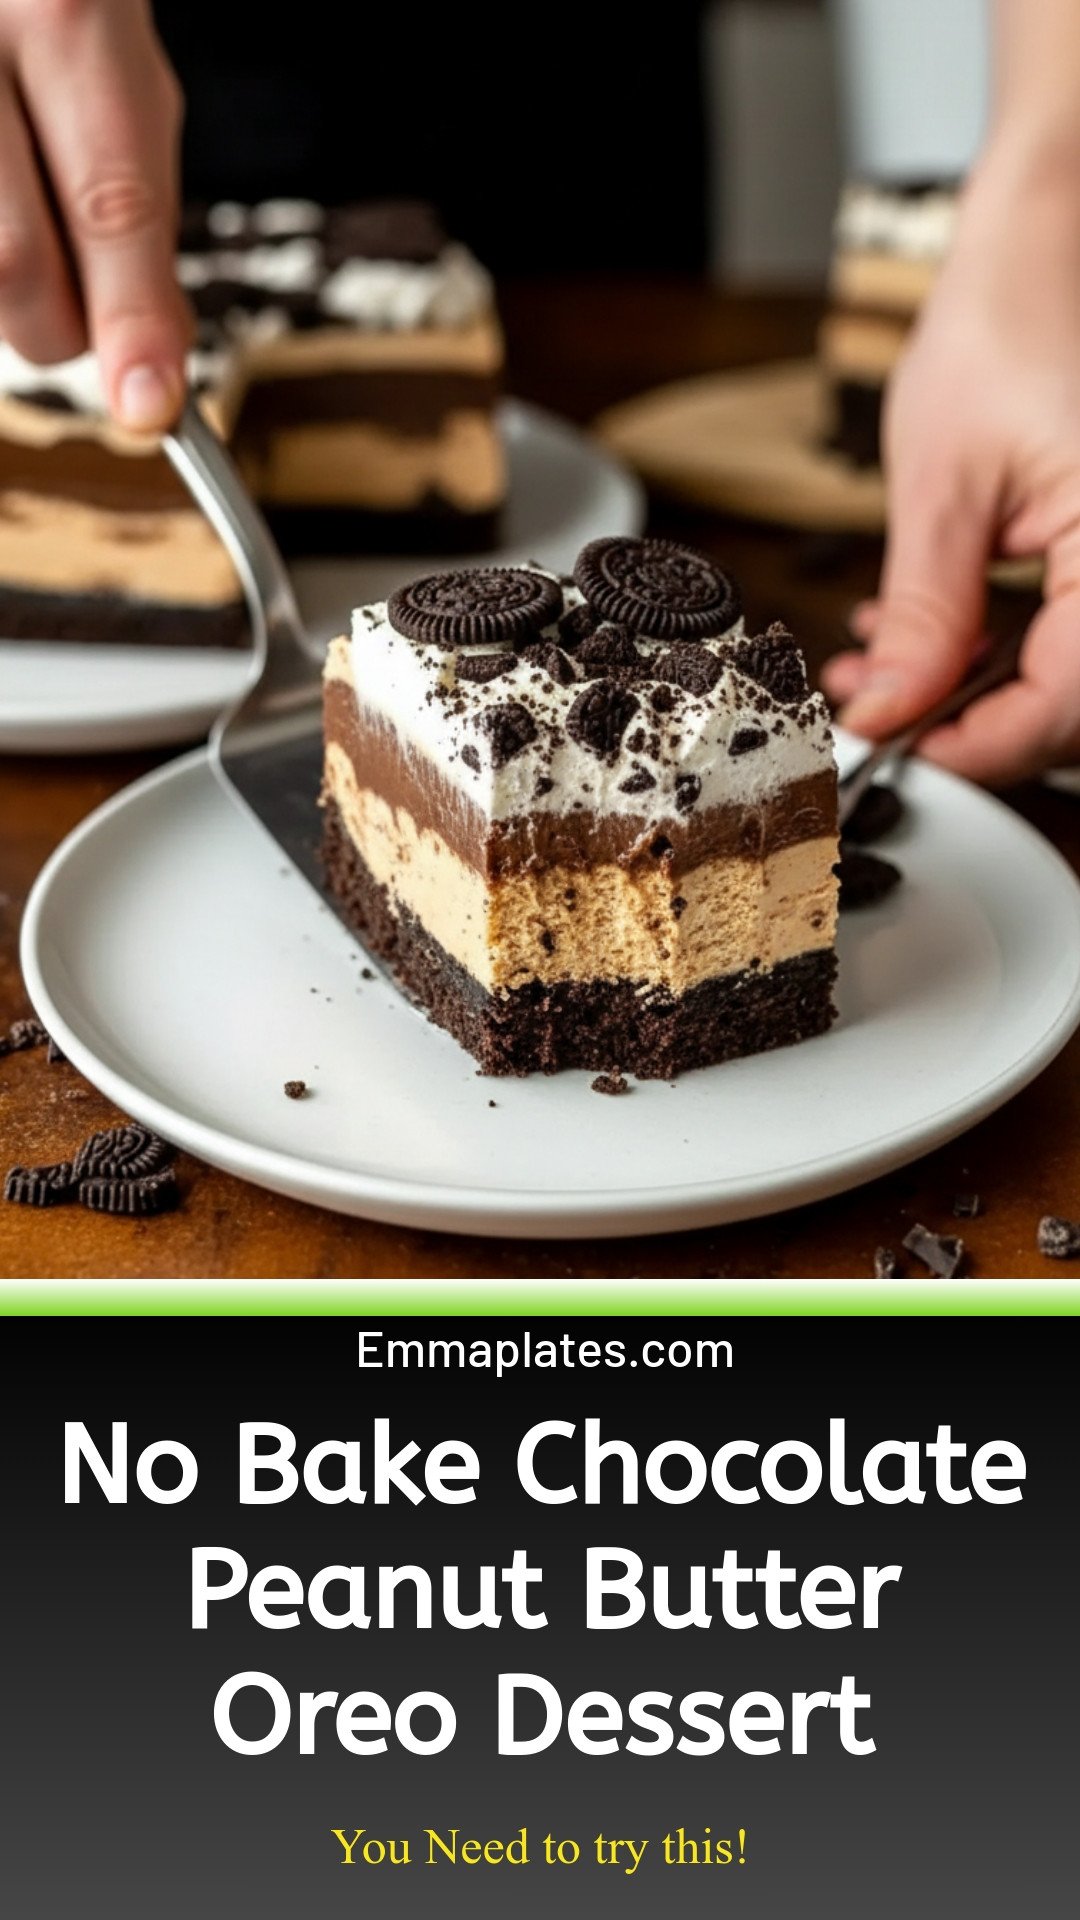
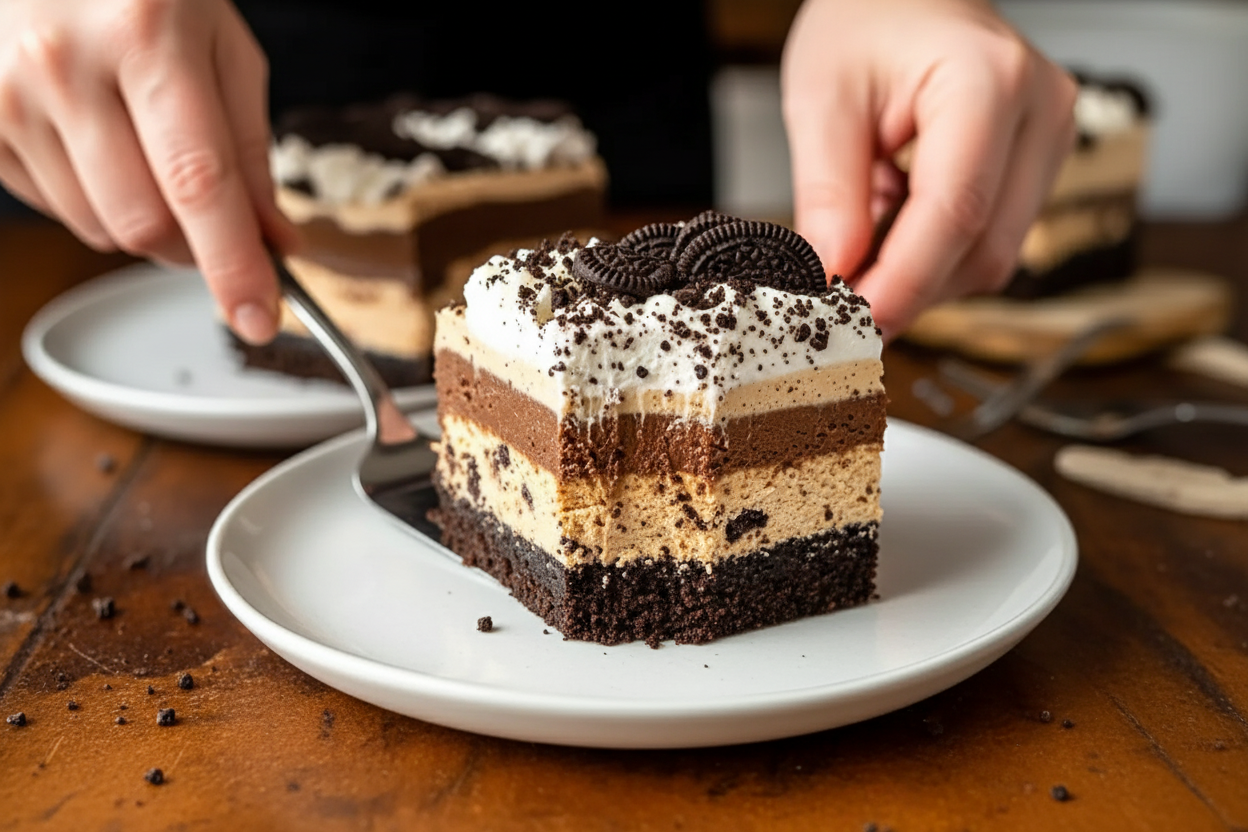
The bottom layer is just crushed Oreos and melted butter. You press it into the pan like you are making a sandcastle. That firm crust gives every other layer something to sit on. *Fun fact: Oreos were invented over 100 years ago, but people still argue about the best way to eat them. Twist? Bite? Dunk? I dip mine in cold milk. Here is why the crust matters: It adds crunch against all the soft, creamy layers. Without it, your dessert would be a puddle. A delicious puddle, but still a puddle. If you need a gluten-free version, just swap in gluten-free Oreos. No one will ever know the difference. Do you have a favorite store-bought cookie for crusts?A Peanut Butter Hug in a Bowl
The next layer is cream cheese, vanilla pudding, peanut butter, and milk. You beat it until it is smooth as velvet. The first time I made it, I licked the beaters clean. One time, I ran out of creamy peanut butter and used crunchy instead. My husband found little peanut bits in his slice and thought it was a fun surprise. Now I do it on purpose. This matters because peanut butter brings protein and a salty-sweet flavor that pairs perfectly with chocolate. You can also use almond butter or cashew butter for a swap. Tell me: crunchy or creamy peanut butter? Which side are you on?That Rich Chocolate Layer
For the chocolate part, you mix cream cheese with instant chocolate pudding and melted chocolate chips. It turns into a thick, shiny river of goodness. I always taste a tiny spoonful before spreading it. You melt the chocolate chips in the microwave for just 30 seconds. Watch it closely so it doesnt burn. Burnt chocolate smells sad and tastes worse. This layer matters because it balances the sweet, salty peanut butter with deep, rich cocoa. You can even swap in semi-sweet chips if you want less sugar. Do you like milk chocolate or dark chocolate better? I think both have their day.The Cool, Fluffy Finish
On top goes whipped topping and more crushed Oreos. Spread the whipped topping like you are frosting a cake. Then sprinkle those cookie crumbs like tiny black-and-white snowflakes. Here is a little trick: If you want extra flavor, make your own whipped cream. Just beat heavy cream with a splash of vanilla until soft peaks form. It tastes like a cloud. This final layer matters because it gives the whole dessert a light, airy bite. After all those rich layers, your mouth needs a soft, cool finish to feel happy. The hardest part is waiting four to six hours for it to chill. I know. I have peeked into the fridge more times than I should admit. Have you ever snuck a taste before a dessert was ready?Why You Will Crave It Forever
Every time I bring this dessert to a gathering, someone asks for the recipe. It disappears faster than lemonade on a July afternoon. People take small bites and close their eyes. This dessert is more than just food. It is the feeling of sitting on a porch with people you love, holding a spoon, and not worrying about a thing. That is real magic. I hope you make this for someone special. Or just for yourself on a Tuesday. You deserve a little sweetness. What dessert do you crave most in the world?Ingredients:
| Ingredient | Amount | Notes |
|---|---|---|
| Oreos | 24 cookies | Substitute with gluten-free Oreos for a gluten-free option. |
| Butter | 1/2 cup | Melted is best for mixing. |
| Cream Cheese | 8 oz | Ensure it’s at room temperature for easy blending. |
| Instant Vanilla Pudding | 1 package | Can swap with other flavors for variety. |
| Creamy Peanut Butter | 1 cup | For a different twist, use almond or cashew butter. |
| Milk | 1/2 cup | Almond milk serves as a great dairy-free substitute. |
| Instant Chocolate Pudding | 1 package | Feel free to experiment with flavors. |
| Milk | 1/2 cup | Use cold milk for the best results. |
| Milk Chocolate Chips | 1 cup | Semi-sweet chips can be used if preferred. |
| Whipped Topping | 2 cups | Try homemade whipped cream for a fresh taste. |
| Crushed Oreos | 6 cookies | A delicious sprinkle on top to finish it off. |
My Favorite No-Bake Dessert (and Why You’ll Love It Too)
I remember the first time I made this dessert. It was for a summer picnic, and I forgot to turn on the oven. I laughed out loud, thank goodness it doesn’t need baking! The layers of crunchy Oreos, creamy peanut butter, and smooth chocolate just melt together. Doesn’t that sound like the perfect treat?
My grandma used to say, “No heat, no sweat.” That’s exactly this recipe. You just mix, layer, and let the fridge do the work. The hardest part? Waiting for it to chill. I still laugh at how my kids would peek in the fridge every thirty minutes.
You can make this in a 9×13 pan. It serves a big crowd, or just a very happy family. And the best part? You probably have most of these ingredients right now. Let me walk you through it, step by step.
Step 1: Start with the Oreo crust. Put 24 Oreos in a food processor. Pulse until they look like fine sand. Grease your pan with a little butter, then spread one-third of the crumbs on the bottom. Press them down firmly with a fork. Hard-learned tip: If you don’t press hard enough, the crust will crumble when you cut it. Use a flat-bottomed glass to really pack it in.
Step 2: Now for the peanut butter layer. Make sure your cream cheese is soft. Beat it with a hand mixer for about two minutes until it’s fluffy. Mix in one packet of vanilla pudding and one cup of creamy peanut butter. Slowly add half a cup of milk. Spread this over your crust. I like to lick the spatula—don’t tell anyone!
Step 3: Sprinkle another third of your Oreo crumbs over the peanut butter layer. Press them down gently. This gives a nice crunch in the middle. My grandkids call it the “secret crunch layer.” What would you call it? Share below!
Step 4: Time for the chocolate layer. In a clean bowl, blend the rest of the cream cheese with one packet of chocolate pudding. Melt one cup of milk chocolate chips in the microwave for 30 seconds. Stir until smooth. Let it cool for a minute, then mix it in. Add half a cup of cold milk. Spread this over your Oreo layer.
Step 5: Finish it off! Spread two cups of whipped topping over the chocolate layer. Sprinkle the last of your crushed Oreos on top. Cover it and put it in the fridge. Let it chill for 4-6 hours. I promise it’s worth the wait.
Cook Time: 4-6 hours
Total Time: 4 hours 15 minutes
Yield: 12 servings
Category: Dessert
Three Fun Twists to Try
Sometimes I like to change things up a little. Here are three ideas that my family loves. Which one would you try first? Comment below!
Peppermint Crunch: Swap the Oreos for chocolate mint cookies. Add a few crushed candy canes on top. It tastes like Christmas in July!
Berry Bliss: Layer fresh strawberries or raspberries between the peanut butter and chocolate. The tart fruit cuts through the sweetness perfectly.
Salty Pretzel Twist: Swap half the Oreo crumbs for crushed pretzels. That salty-sweet combo is impossible to resist. Trust me, it disappears fast.
How to Serve and Enjoy
A cold slice of this dessert is wonderful on its own. But if you want to dress it up, drizzle a little chocolate syrup on the plate. A dollop of fresh whipped cream never hurts either. For a fancy touch, add a few whole raspberries on top. Doesn’t that look pretty?
As for drinks, I love a tall glass of cold milk with this. It’s classic and simple. For the grown-ups, a small cup of coffee or a glass of port wine pairs beautifully. The rich flavors just sing together. Which would you choose tonight?

How to Store This No-Bake Dessert
This dessert needs to stay cold. Keep it in the fridge, covered tightly, for up to five days. The layers stay firm and creamy that way.
You can also freeze it for up to a month. Just wrap the whole pan in plastic wrap, then foil. Thaw it in the fridge overnight before serving.
I once forgot a slice on the counter for two hours. The whipped topping got runny, and the crust turned soggy. Now I always pop leftovers straight in the fridge.
Making this ahead for a party? That is smart. The flavors get better after a day in the fridge. Batch cooking saves time and stress. Have you ever tried storing it this way? Share below!
Common Problems and Easy Fixes
Your crust might crumble when you slice it. That happens if you do not pack the crumbs down firmly. Use the back of a fork or a flat glass to press them hard.
Maybe your peanut butter layer is lumpy. I remember the first time I made this, I used cold cream cheese. It was a mess. Let your cream cheese sit out for 30 minutes first. Which of these problems have you run into before?
Another issue is a watery chocolate layer. Cold milk helps the pudding set right. If your melted chocolate chips are too hot, they can curdle the cream cheese. Let them cool for a minute.
Why does this matter? Fixing these small things makes your dessert look beautiful. It also builds your cooking confidence. You learn that little steps make a big difference.
Your Questions, Answered
Q: Can I make this gluten-free? Yes. Use gluten-free Oreos. Everything else is already gluten-free.
Q: Can I make it ahead of time? Absolutely. It needs 4-6 hours to chill anyway. You can make it a day early.
Q: Can I swap the peanut butter? Sure. Almond or cashew butter works great. The texture stays the same.
Q: What if I want a smaller batch? Halve all the ingredients. Use an 8×8 pan instead.
Q: Can I skip the whipped topping? You can, but it adds lightness. Try homemade whipped cream for a fresher taste.
Which tip will you try first?
*Fun fact: Oreos were invented in 1912. They are the best-selling cookie in the United States.*
A Sweet Farewell from Emma
I hope this dessert brings a little joy to your kitchen. It is simple, forgiving, and full of cozy flavors. That is what I love about no-bake recipes.
If you make it, I would love to see your creation. Take a photo and share it with us. Have you tried this recipe? Tag us on Pinterest!
Remember, cooking is about sharing and making memories. Even a messy slice tastes good when you laugh about it. Keep it simple, keep it sweet.
Happy cooking!
—Emma Caldwell.
No Bake Chocolate Peanut Butter Oreo Dessert You’ll Crave Forever: No Bake Chocolate Peanut Butter Oreo Dessert
Description
Indulge in the ultimate no bake dessert with chocolate, peanut butter, and Oreos. Rich, creamy, and easy to make.
Ingredients
Instructions
- Prepare the Oreo Crust: Place the Oreos in a food processor and pulse until finely crushed, resembling sand. In a greased 9×13 pan, spread one-third of the Oreo crumbs evenly across the bottom and pack down firmly using the back of a fork to create a solid crust.
- Create Peanut Butter Layer: In a mixing bowl, beat the cream cheese with a hand mixer until smooth and creamy, about 2 minutes. Gradually mix in the instant vanilla pudding and creamy peanut butter until combined. Slowly add milk until the mixture is smooth and spreadable. Layer this peanut butter mixture over the prepared Oreo crust.
- Layer Again: Sprinkle the remaining one-third of the crushed Oreos over the peanut butter layer, ensuring even distribution. Press the crumbs down to create a cohesive layer.
- Make Chocolate Layer: In a clean mixing bowl, blend the cream cheese with the instant chocolate pudding until smooth, about 2 minutes. Melt the milk chocolate chips in a microwave-safe bowl (about 30 seconds on high, stirring until melted). Combine the cooled chocolate mix with the cream cheese mixture and gradually add in milk. Spread this chocolate layer over the Oreo layer.
- Final Layer and Chill: Top the chocolate layer with the remaining crushed Oreos. Spread the whipped topping over the chocolate layer, cover, and chill in the refrigerator for 4-6 hours.
Notes
- For a gluten-free option, substitute Oreos with gluten-free Oreos.


Leave a Reply