

My First Burnt Top
I almost cried the first time I made this cake. The top looked burnt! I thought I ruined it. But that dark, toasty top is the whole point. It gives the sweet cream inside a wonderful, deep flavor. I still laugh at that memory now.
This style comes from Spain. Bakers there wanted a simpler, rustic cheesecake. They baked it very hot. This creates that beautiful dark crust. The inside stays wonderfully soft and creamy. It’s a happy accident that became a treasure.
Why Room Temperature Matters
Let’s talk about your cream cheese and eggs. Please take them out early. Let them sit on the counter. Why does this matter? Cold ingredients don’t mix together smoothly. You’ll get little lumps in your batter.
Warm ingredients blend like a dream. Your batter will be silky and perfect. This one simple step makes all the difference. It’s the secret to that melt-in-your-mouth feel. Do you have a trick for softening cream cheese fast? I sometimes put the block on a warm plate.
The Joy of a Simple Crust
No rolling pin needed here. We just press the crumbs right into the pan. I use the bottom of a measuring cup to press them flat. It’s so easy. Doesn’t that smell amazing? Graham crackers and brown sugar are a perfect pair.
We don’t even pre-bake this crust. The freezer firms it up. Then the hot oven does the rest. *Fun fact: Graham crackers were invented to be a healthy, plain snack! Now we use them for sweet, buttery crusts. I think that’s funny.
Baking Without Fear
Here is the scary part. You must trust the recipe. The cake will puff up like a golden balloon. The center will still wiggle when you take it out. That is okay. It is supposed to do that.
It will sink as it cools. That’s how you get the creamy middle. This matters because it teaches us to trust the process. Not everything perfect comes out of the oven looking perfect. Do you prefer your cheesecake warm and custardy or cold and firm? I can never decide!
Sharing the Sweetness
I love cutting these into bars. They are perfect for sharing. I wrap them in little parchment squares. I give them to neighbors, mail carriers, and friends. Food is my favorite way to say “I’m thinking of you.”
Making this recipe is about more than dessert. It’s about trying something new. It’s about enjoying the process, even the “mistakes.” What’s the last new recipe you were brave enough to try? Tell me about it. I’d love to know.
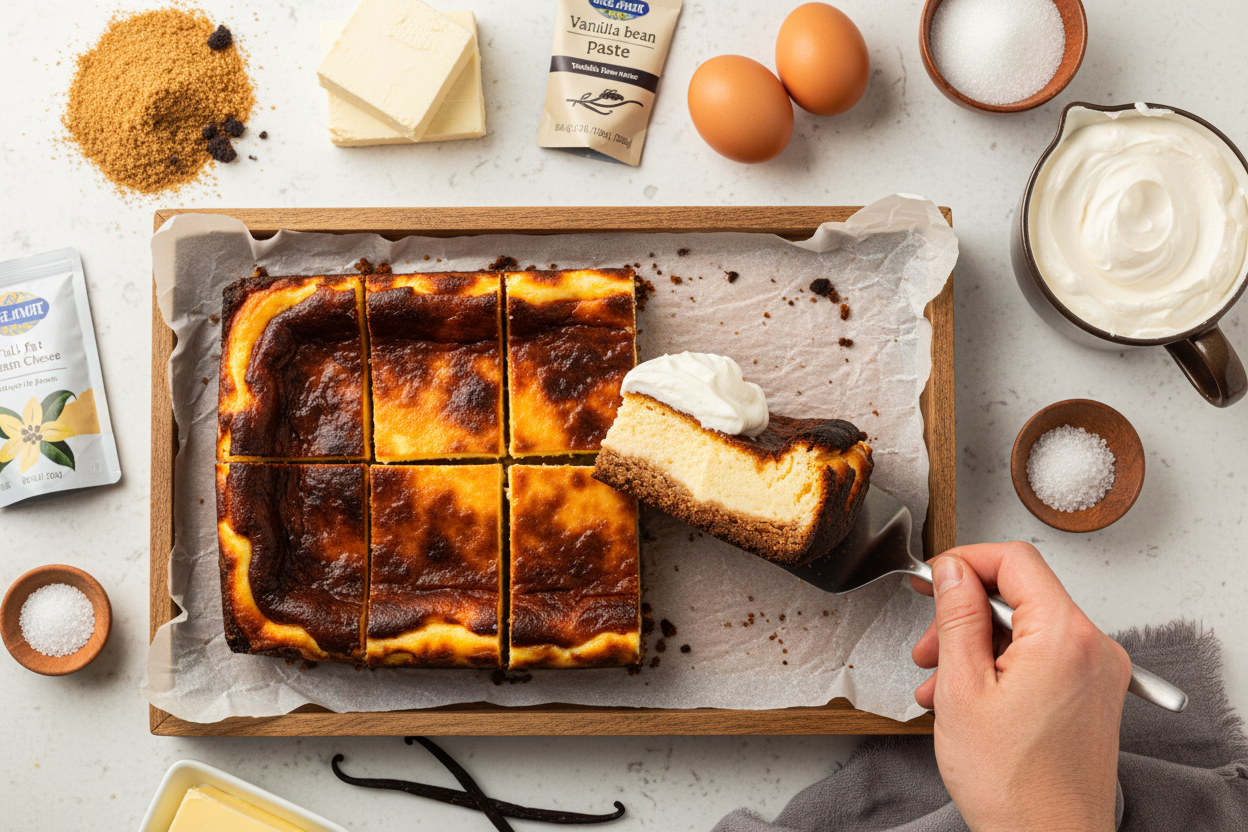
Ingredients:
| Ingredient | Amount | Notes |
|---|---|---|
| Graham cracker crumbs | 3 cups | 27 sheets / 3 packets |
| Dark brown sugar | 3 Tbsp. | |
| Granulated sugar | 2 Tbsp. | For crust |
| Unsalted butter | 3/4 cup | Melted and slightly cooled |
| Salt | 1 pinch | For crust |
| Full-fat cream cheese | 32 oz. (4 packages) | Softened to room temperature |
| Granulated sugar | 1 1/2 cups | For cheesecake |
| Large eggs | 6 | Room temperature |
| Heavy cream | 1 2/3 cups | Room temperature |
| All-purpose flour | 1/3 cup | Spooned and leveled |
| Fine sea salt | 1 tsp. | |
| Vanilla bean paste | 1 tsp. |
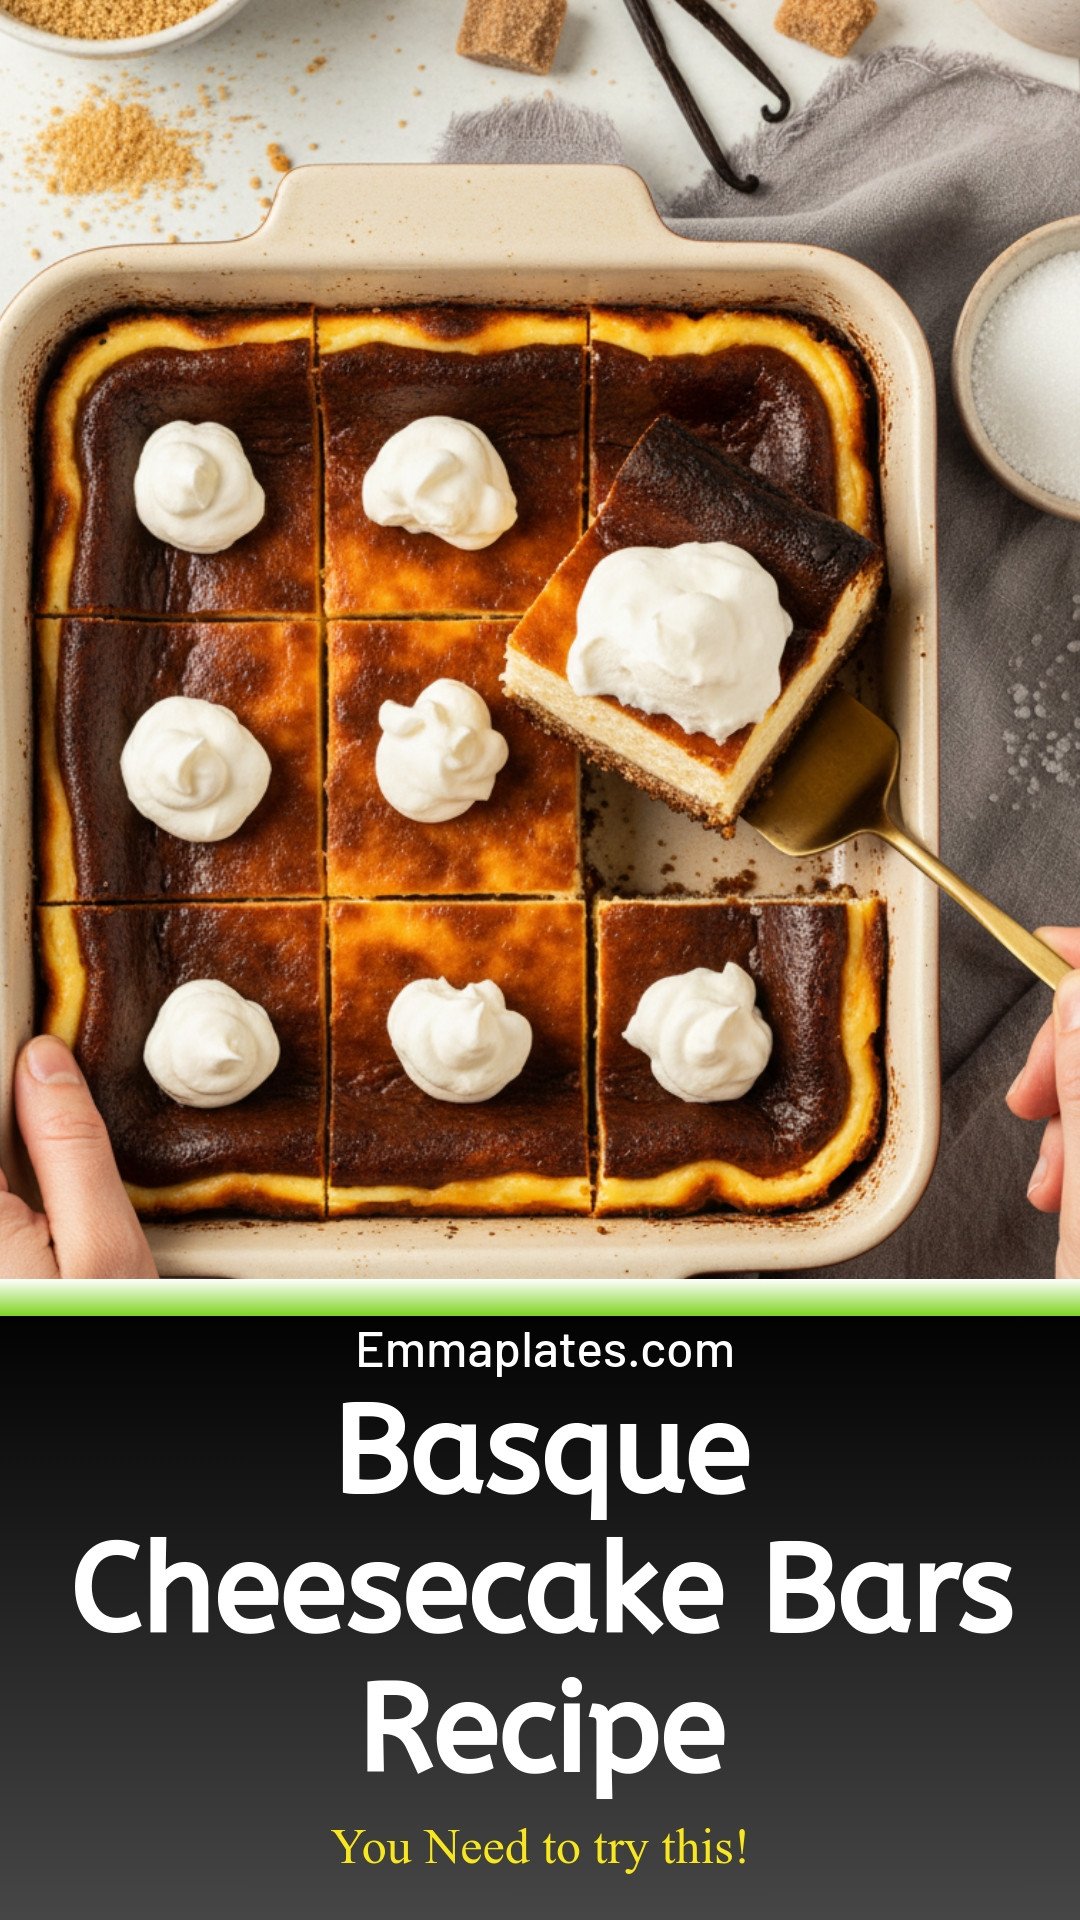
My Famous Basque Cheesecake Bars
Hello, my dear! Let’s make something special today. These bars are my new favorite thing. They are creamy and rich with a lovely dark top. I first tried them at a little bakery. I knew I had to make them at home. Now I make them for every family gathering. The best part is how simple they are. You don’t even have to bake the crust first. Isn’t that a nice little shortcut?
Just remember, room temperature ingredients are your best friends here. It makes everything so smooth. (My hard-learned tip: if the cream cheese is cold, you’ll get lumps. Trust me, I learned the hard way!). Let’s get our hands busy. I’ll tell you a story as we go. My grandson calls these “burnt cheesecake.” I still laugh at that.
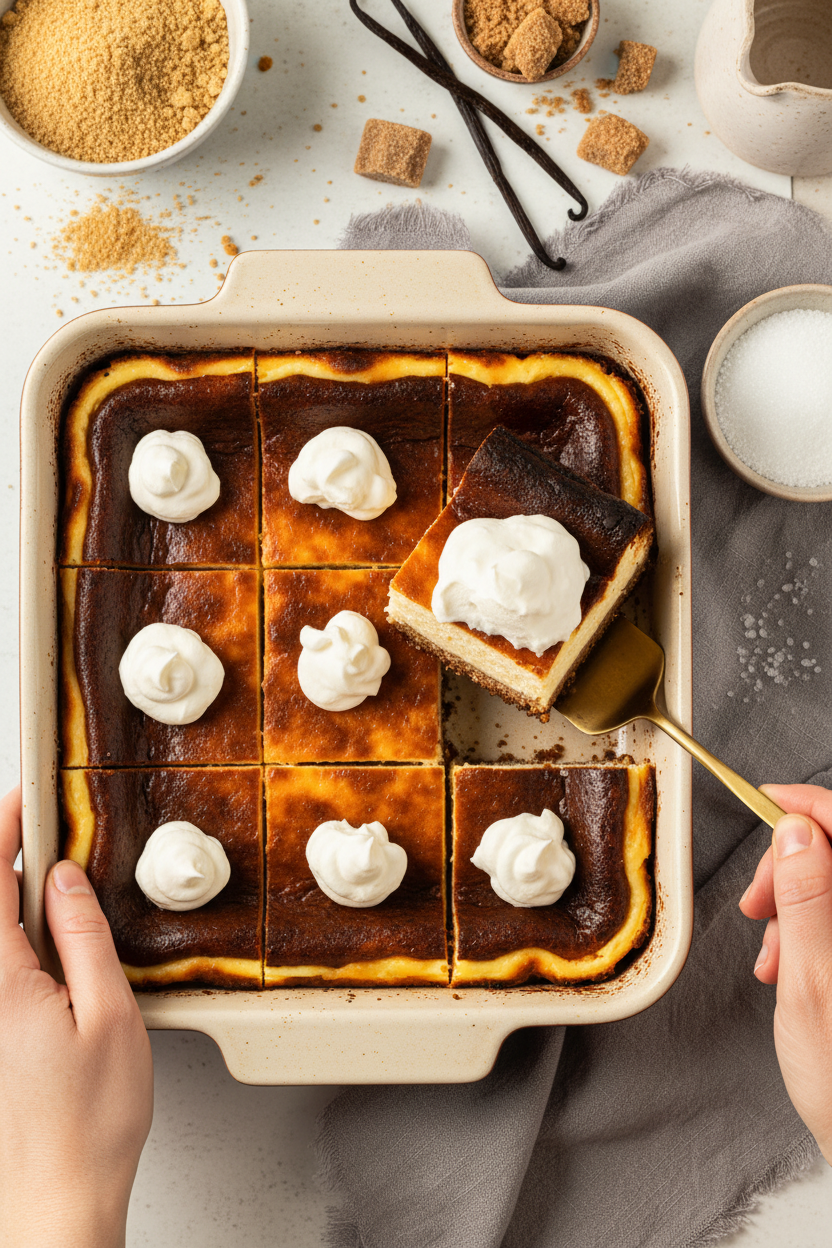
Step 1: Grab your 9×13 pan. Line it with parchment paper. Let the paper hang over the sides. This makes your life so much easier later. You’ll just lift the whole thing out! Preheat your oven to 400°F. It needs to be nice and hot. Step 2: Let’s make the crust. Crush those graham crackers into fine crumbs. A food processor is fastest. You can also put them in a bag and roll them. Mix the crumbs with both sugars and a pinch of salt. Pour in the melted butter. Mix until it looks like wet sand. Step 3: Press the crumbs firmly into your pan. Use a cup to press it down flat. Now, pop the whole pan into the freezer. This chills the butter so the crust holds together. We don’t need to pre-bake it. Isn’t that wonderful? Step 4: Time for the filling. Beat the soft cream cheese and sugar together. Do this for a few minutes. You want it super smooth and creamy. Scrape the bowl down. Now add the eggs, one at a time. Let each one disappear before adding the next. Step 5: Pour in the cream and vanilla. Add the salt, too. Mix on low just until it’s combined. Now, sift your flour right into the bowl. Mix one last time, just until you don’t see flour. A few tiny lumps are perfectly fine. They will vanish, I promise. Step 6: Pour this lovely batter over your crust. Smooth the top gently. Tap the pan on the counter a few times. This gets rid of sneaky air bubbles. Doesn’t that batter smell amazing already? Step 7: Bake it for about 50 minutes. The top will get very dark brown. It will puff up like a proud little cloud. The center should still have a slight jiggle. It will sink as it cools, and that’s good! What does the jiggly center tell us? Share below! Step 8: Let the pan cool completely on the counter. You can slice it now for a soft, custardy treat. Or chill it first for firmer bars. Both ways are delicious. I can never wait, so I usually have a warm piece. Cook Time: 50 minutesTotal Time: About 4 hours (includes cooling)
Yield: 12-16 bars
Category: Dessert, Baking
Three Fun Twists to Try
Once you master the basic recipe, you can play! Here are three of my favorite ideas. They make the bars feel brand new. My book club loved the lemon version last spring.
Citrus Sunshine: Add the zest of one lemon or orange to the filling. It gives a bright, fresh little kick. Berry Swirl: Gently swirl 1/3 cup of raspberry jam into the batter before baking. You’ll get pretty pink ribbons. Chocolate Chip: Fold 1 cup of mini chocolate chips into the filling. They get all melty and wonderful.Which one would you try first? Comment below!
Serving Them Up Right
These bars are fantastic all on their own. But a little extra touch makes them a celebration. For a fancy plate, add a few fresh berries on the side. A tiny sprinkle of sea salt on top is also lovely. It makes the sweetness just pop.
What to drink? For the grown-ups, a small glass of sherry or a sweet dessert wine is perfect. For everyone, a cold glass of milk or a fizzy cream soda is just right. The creaminess needs that cool contrast. Which would you choose tonight?
Keeping Your Cheesecake Bars Happy
Let’s talk about storing these lovely bars. They keep well in the fridge for five days. Just cover the pan tightly. You can also freeze them for a month. I wrap each bar in plastic wrap first. Then I place them all in a freezer bag.
My first time, I froze a whole pan. It was a brick! Now I slice before freezing. This way, I can grab one sweet treat anytime. Batch cooking is a gift to your future self. It means a homemade dessert is always ready for you.
No need to reheat, but you can. Let a frozen bar thaw in the fridge overnight. Or warm a slice for ten seconds in the microwave. This makes it wonderfully soft. Have you ever tried storing it this way? Share below!
Simple Fixes for Common Hiccups
Every cook faces little problems. Here are three easy fixes. First, a cracked top. This happens if the oven is too hot. I remember when my first cheesecake looked like a dry lakebed. Use an oven thermometer to check the temperature.
Second, a soggy crust. Make sure your melted butter has cooled a bit. Press the crust firmly into the pan. This creates a solid barrier. Getting the crust right matters for that perfect bite. It gives you a nice crunch with the creamy filling.
Third, a grainy filling. This is from over-mixing. Stop as soon as the flour disappears. Some small lumps are just fine. They will melt away in the oven. Gentle mixing keeps your cheesecake smooth and luxurious. Which of these problems have you run into before?
Your Quick Questions, Answered
Q: Can I make this gluten-free? A: Yes! Use gluten-free graham crackers. Also use a gluten-free flour blend instead of all-purpose.
Q: Can I make it ahead? A: Absolutely. Bake it a day or two before you need it. The flavor gets even better.
Q: Any simple ingredient swaps? A: For the crust, digestives or vanilla wafers work. You can use vanilla extract instead of paste.
Q: Can I make a smaller batch? A: You can halve the recipe. Use an 8×8 inch pan. The baking time will be a bit shorter.
Q: Any optional tips? A: A fun fact: letting ingredients reach room temperature is key. It helps everything blend smoothly without over-mixing. Which tip will you try first?
From My Kitchen to Yours
I hope you love making these bars as much as I do. They are a little taste of cozy joy. Sharing food is one of life’s sweetest pleasures. I would be so delighted to see your creation.
Have you tried this recipe? Tag us on Pinterest! You can find me at @EmmaCaldwellEats. I love seeing your kitchen adventures. Thank you for spending this time with me in my cozy kitchen corner.
Happy cooking!
—Emma Caldwell.
Basque Cheesecake Bars: Basque Cheesecake Bars Recipe
Description
Creamy, burnt Basque cheesecake in easy bar form! Perfectly rich with a caramelized top and a luxuriously soft center. A stunning, simple dessert for any occasion.
Ingredients
=== Crust ===
=== Cheesecake ===
Instructions
- Line a 9×13-inch baking pan with parchment. It needs to have some overhang over the pan so it’s easy to lift them out. 🙂
- Preheat the oven to 400°F.
- Use food processor to blitz the graham crackers into crumbs. I know it’s a lot of graham crackers, so you can work in batches if needed.
- Then add in the sugars and salt and pulse until combined. Stream in the melted butter until graham cracker crumbs are moistened.
- Press this mixture into the prepared pan. Place in freezer, no need to pre-bake.
- Using a stand mixer fitted with the paddle attachment, beat the cream cheese and sugar for 2-3 minutes until very smooth.
- Add the eggs in, one at a time, on medium-low speed, until each egg is combined before adding the next egg.
- Add the cream, vanilla, and salt on low just until combined. Scraping down sides of bowl as needed. Sift in the flour and mix on low once again, just until combined. Do not over-mix it. Some clumps are ok, they will bake out.
- Pour into prepared pan, smoothing out the tops, tap on counter a few times to release any air bubbles.
- Bake for ~50 minutes or until the tops have a deep golden brown color, the cheesecake has puffed up, but is still slightly jiggly in the center. It will puff up, but then somewhat deflate as it cools, and that’s OK!
- Remove from oven and cool in pan completely. You can slice into it now for a more custard-like center, or refrigerate, then cut into bars for a more classic cheesecake texture. Yum! Enjoy!
Notes
- For a more custard-like center, slice after cooling at room temperature. For a firmer, classic cheesecake texture, refrigerate before slicing into bars.


Leave a Reply