
A Pie That Whispers of Sunshine
This pie makes me think of summer. It is tart, sweet, and cool. The smell of lime zest is pure sunshine. Doesn’t that smell amazing?
I first made it for my grandson. He made a funny, puckered-up face with the first bite. Then he took a bigger bite. I still laugh at that. It is now his favorite. That is why this matters. Food becomes a happy memory.
The Crunchy, Buttery Start
Let’s start with the crust. It is just graham crackers, butter, and sugar. You press it into the pie dish with your fingers. I like this part. It feels like making mud pies, but tastier.
Chilling it before baking is my secret. It keeps the crust from crumbling later. A good crust holds everything together. That is another reason this matters. A little patience makes everything better.
The Magic of the Filling
The filling is not baked. The magic is in the gelatin. You mix it with warm lime juice. This makes the pie set up firm and silky. It is like a kitchen science trick.
Then you mix the creamy things. Cream cheese, yogurt, sugar, and that lovely zest. The yogurt makes it light. The cream cheese makes it rich. They are perfect together. What is your favorite creamy pie? Is it lemon, chocolate, or something else?
A Little Lime History
Key limes are special. They are smaller and yellower than regular limes. They also have more seeds. But their flavor is fantastic. It is tart and very fragrant.
Fun fact: Key limes got their name from the Florida Keys. That is a string of tropical islands. Sailors used to take them on ships to prevent sickness. Now we just use them for tasty pies. Do you have a fruit that reminds you of a special place?
Chill Out and Serve
After pouring the filling, walk away. Let the fridge do its work for an hour. This is the hardest part. Waiting is tough when you want a slice.
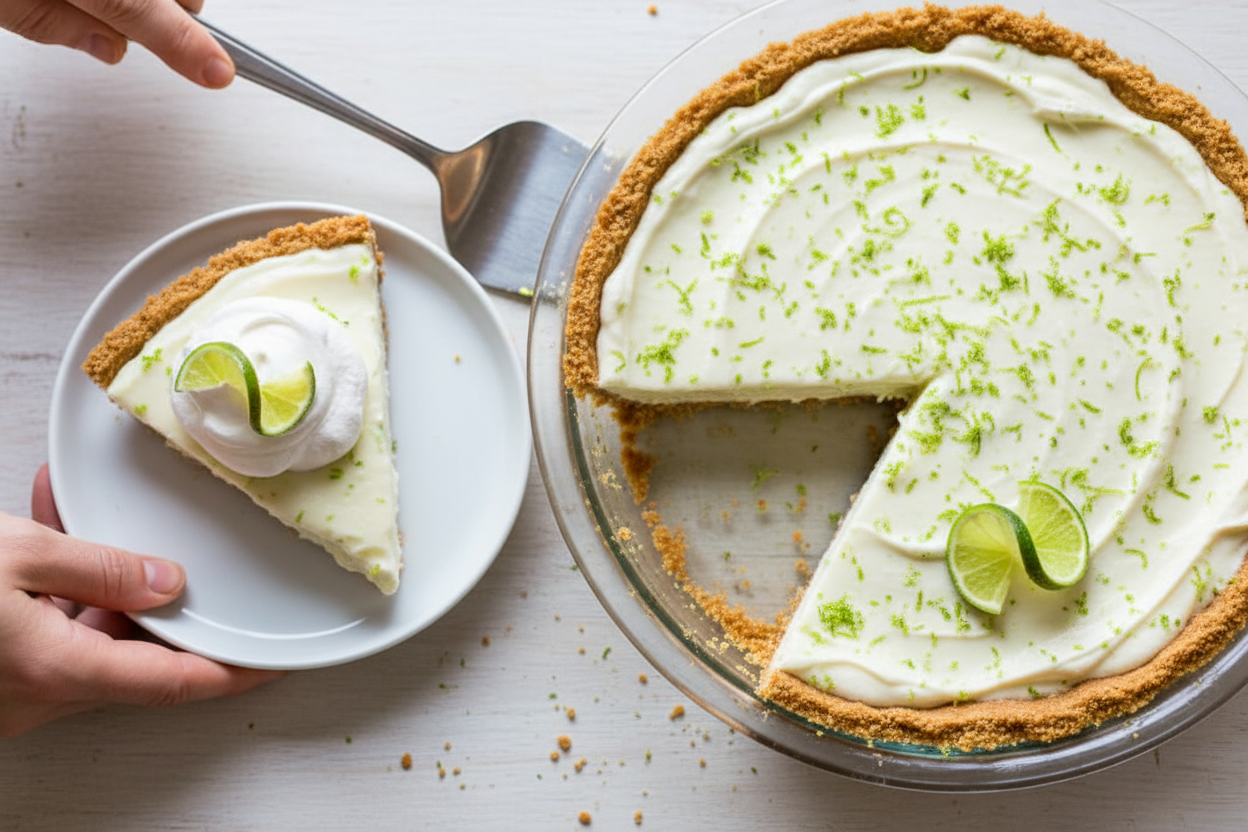
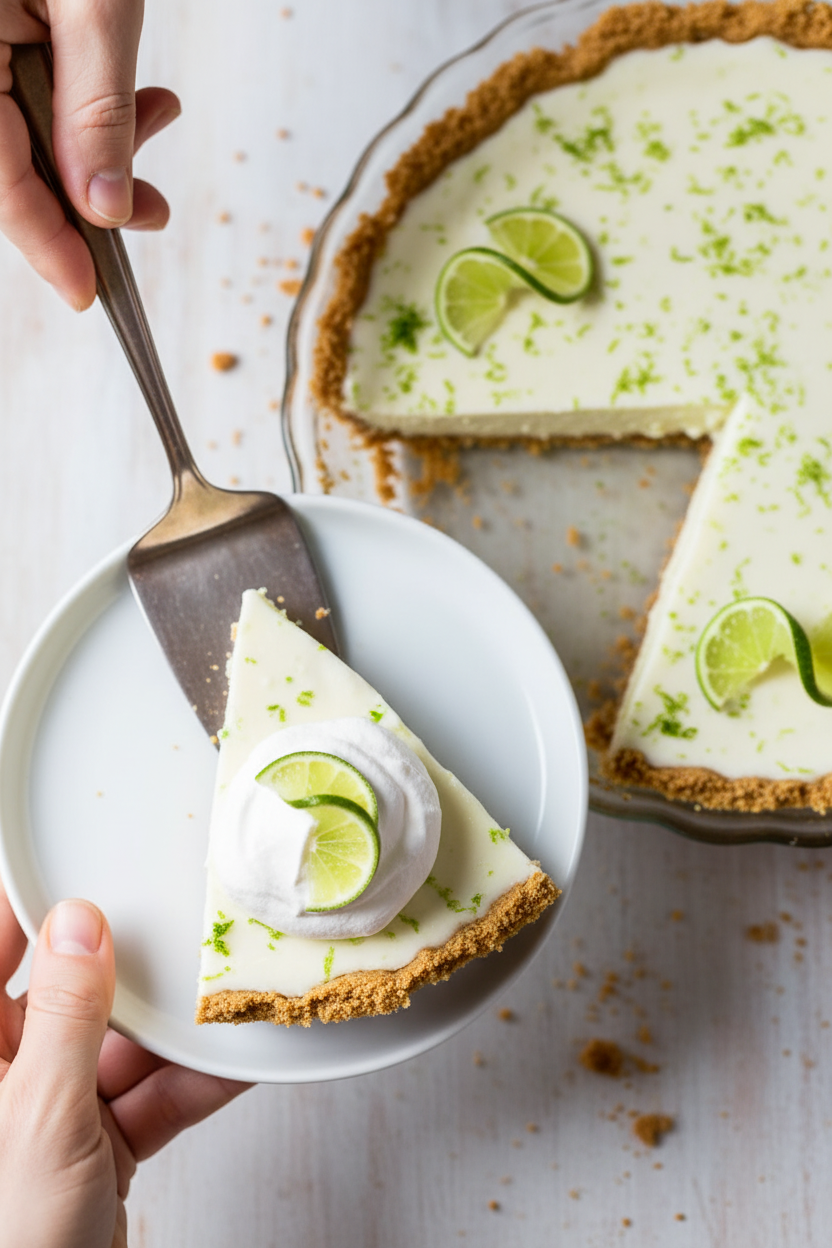
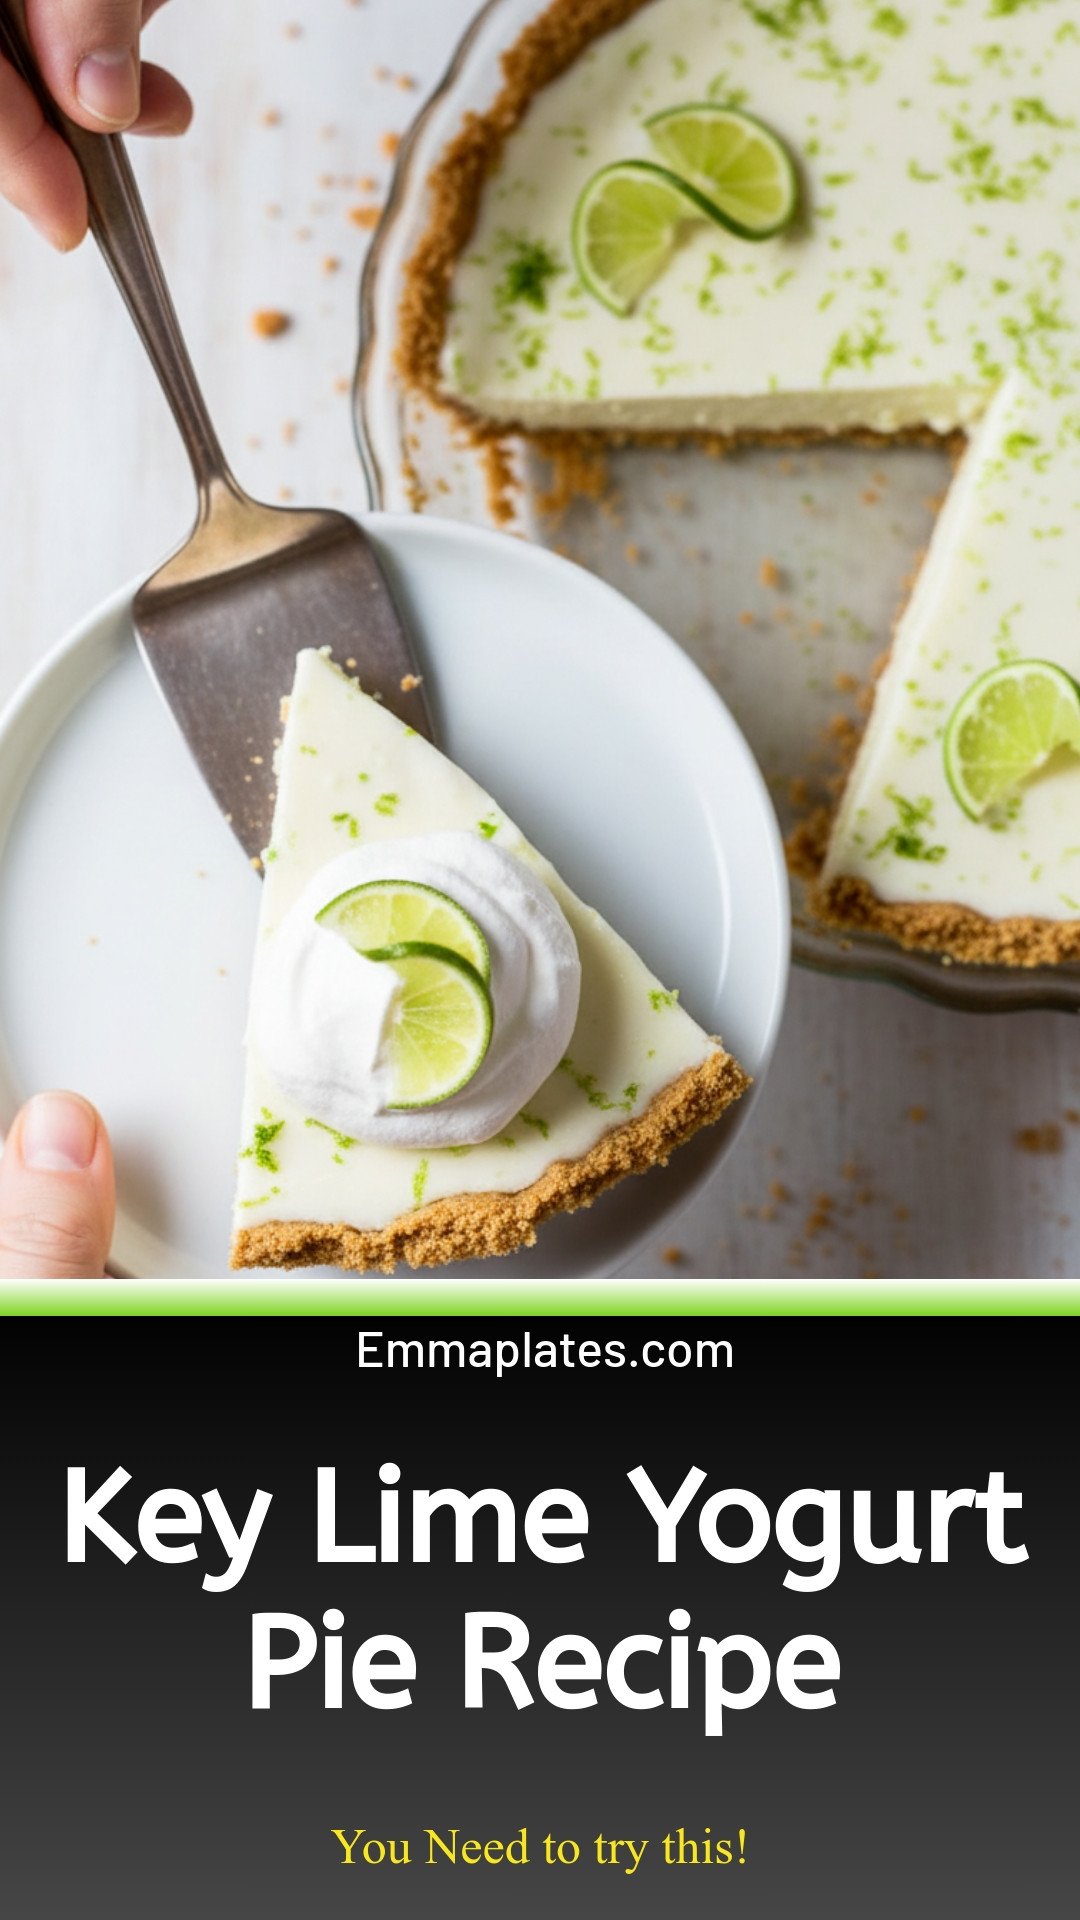
A dollop of whipped cream on top is lovely. A thin lime slice looks pretty. But it is wonderful plain, too. The first cool, creamy bite is the reward. What is your favorite topping for a pie? I would love to know.

Ingredients:
| Ingredient | Amount | Notes |
|---|---|---|
| Graham crackers | 6 sheets (3.5 oz total) | |
| Cold whipped butter | 3 tablespoons | |
| Sugar | 2 tablespoons | For crust |
| Gelatin | 1 1/2 teaspoons | |
| Key lime juice | 1/2 cup | Fresh squeezed or bottled |
| 1/3 less fat cream cheese | 6 ounces | |
| 0% fat plain yogurt | 1 cup | |
| Sugar | 1/2 cup | For filling |
| Grated lime zest | 1 tablespoon | |
| Key lime slices | For garnish | Optional |
| Whipped cream | For garnish | Optional |
My Sunshine Pie: A Tart & Tangy Treat
Hello, dear! Let’s make a pie that tastes like a sunny afternoon. This Key Lime Yogurt Pie is my happy place. It’s creamy, tangy, and just sweet enough. I think of my Florida trips whenever I make it. Doesn’t that smell amazing? The lime zest makes the whole kitchen sing.
We’ll start with the crust. It’s like building a sandy, buttery foundation. I still laugh at the time I tried to press it in with a fancy tool. My hands work best! Here is our simple plan.
Step 1: Make your crumb crust. Put graham crackers, cold butter, and sugar in a food processor. Pulse it until it looks like wet sand. Press this mix firmly into your pie dish. Chill it for 30 minutes. This keeps it from crumbling later. (My hard-learned tip: Use a measuring cup to press it smooth!).
Step 2: Bake and cool that crust. Heat your oven to 375°F. Bake the empty crust for 8 to 10 minutes. Watch for golden edges. Let it cool completely on a rack. A warm crust will melt our filling. Patience is a kitchen virtue, I always say.
Step 3: Wake up the gelatin. Mix gelatin with 2 tablespoons of lime juice in a bowl. Warm the rest of the juice for 30 seconds. Stir it into the gelatin mix until it dissolves. This magic step makes our pie sliceable. Why do we warm the juice? Share below!
Step 4: Make the creamy filling. Beat cream cheese, yogurt, sugar, and lime zest together. Pour in your lime-gelatin liquid. Mix it all until it’s smooth and happy. Now pour this into your cooled crust. Gently tap the dish to remove air bubbles.
Step 5: Chill out, pie! Pop the pie into the refrigerator. Let it set for at least one hour. I know waiting is the hardest part. Use the time to tidy up. Then, add whipped cream and lime slices if you like. Every slice is a little sunshine.
Cook Time: 10 minutes
Total Time: 1 hour 50 minutes (plus chilling)
Yield: 8 servings
Category: Dessert, Pie
Three Twists on Our Tangy Favorite
This pie is a wonderful friend. It loves to play dress-up! Here are three fun ways to change its outfit. Each one brings a new smile to the table.
Coconut Dream: Mix 1/2 cup shredded coconut into the graham cracker crust. It toasts up so nice. It tastes like a tropical vacation.
Berry Swirl: Before chilling, dollop spoonfuls of raspberry jam on the filling. Swirl it with a knife. You get pretty pink ribbons in every bite.
Ginger Snap: Use ginger snap cookies instead of graham crackers for the crust. It adds a warm, spicy little kick. It’s a surprising dance of flavors.
Which one would you try first? Comment below!
Serving Your Slice of Sunshine
This pie is a star all on its own. But I love making a moment of it. For a pretty plate, add a mint leaf beside the lime slice. The green on green is so fresh. A few berries on the side look lovely, too.
What to drink? For a fancy night, a glass of crisp Prosecco is lovely. The bubbles cut through the cream. For every day, I love a tall glass of iced mint tea. It’s so refreshing with the lime. Which would you choose tonight?
Keeping Your Key Lime Pie Perfect
This pie loves the cold. Keep it covered in the fridge for up to three days. The crust stays nice and crisp this way.
You can also freeze it for a sweet treat later. Wrap the whole pie tightly in plastic wrap. Then slide it into a freezer bag. It will keep for one month.
Thaw it overnight in your refrigerator. I once forgot to wrap it well. The pie tasted like my frozen peas! Storing food right saves flavor and money. It means less waste and more happy surprises.
You can make the crust a day ahead. Just keep it covered on the counter. Have you ever tried storing it this way? Share below!
Simple Fixes for Common Pie Problems
Is your crust crumbling? Make sure you press it in firmly. Chilling it before baking is the secret step. I remember when I skipped this. My crust fell apart like sand!
Is the filling too runny? Your gelatin might not have dissolved fully. Warm the lime juice just until it feels hot to your finger. Do not let it boil. This step matters for a sliceable pie.
Is the flavor not tangy enough? Always add the lime zest. The zest holds the brightest oil. This makes the flavor sing. Getting these little things right builds your cooking confidence. Which of these problems have you run into before?
Your Key Lime Pie Questions, Answered
Q: Can I make this gluten-free? A: Yes! Use gluten-free graham crackers for the crust. The filling is already gluten-free.
Q: Can I make it ahead? A: Absolutely. Make the whole pie one day before you need it. The chill time makes it even better.
Q: I don’t have key limes. A: Regular lime juice works just fine. The pie will still be delicious and zingy.
Q: Can I double the recipe? A: For a bigger crowd, yes. Just use a 9×13 inch dish instead of a pie plate.
*Fun fact: Key limes are also called Mexican or West Indian limes.* Which tip will you try first?
From My Kitchen to Yours
I hope this pie brings a little sunshine to your table. It always reminds me of summer afternoons. I love seeing your kitchen creations.
Please share your baking stories with me. Have you tried this recipe? Tag us on Pinterest! You can find me at @EmmasCozyKitchen. I would love to see your beautiful pies.
Happy cooking!
—Emma Caldwell.
Key Lime Yogurt Pie: Key Lime Yogurt Pie Recipe
Description
Creamy no-bake Key Lime Yogurt Pie! A light, tangy dessert with a crunchy graham cracker crust. Perfect for summer parties or a refreshing treat.
Ingredients
Instructions
- For the graham cracker crust (you can also use a pre-made crust if you prefer): Place graham crackers, butter and sugar into a food processor and pulse a few times. Add 1 tbsp water and pulse a few more times until it has a texture of coarse meal.
- Press into an 8-inch pie dish making the crust about 1/8-inch thick evenly all around and up the sides. Refrigerate the crust for 30 minutes before you bake it, this will help prevent crumbling when you want to serve it.
- Preheat oven to 375°F. Bake until the edges are golden, about 8 to 10 minutes. Remove from the oven and let the crust cool on a wire rack, before filling.
- Key Lime Filling: In a small bowl combine 2 tablespoons of the lime juice with the gelatin and stir. Warm the remaining 6 tablespoons of key lime juice for 30 to 45 seconds in the microwave (this is to dissolve the gelatin, don’t let it boil) and quickly mix well to dissolve the gelatin.
- In a large bowl with a hand mixer combine the cream cheese, yogurt, sugar and lime zest. Mix well, then add in the key lime juice and mix well, until fully incorporated, then pour into graham cracker crust.
- Chill pie thoroughly, at least 1 hour before serving. Garnish with key lime slices and whipped cream, optional, if desired.
Notes
- Nutrition per serving (1 slice): Calories: 139 kcal, Carbohydrates: 19 g, Protein: 3 g, Fat: 6 g, Saturated Fat: 3.5 g, Cholesterol: 9 mg, Sodium: 132.5 mg, Fiber: 0.5 g, Sugar: 14 g


Leave a Reply