

A No-Bake Summer Savior
My kitchen gets so hot in July. I refuse to turn my oven on. This dessert was my summer hero. It is cool, creamy, and full of chocolate.
You just mix and chill. No baking at all. I first made it for my grandson’s birthday picnic. He said it was better than any cake. I still laugh at that. What is your favorite no-bake treat for hot days?
The Magic of the Crust
Let’s start with the base. You crush up those chocolate cookies. Mix them with melted butter. It feels like making mud pies, but it tastes much better.
Pressing it into the pan is important. Make it nice and even. This gives every bite a perfect crunch. A firm crust matters. It holds up all those wonderful, soft layers on top.
Chocolate Clouds
Next is the chocolate cheesecake layer. Beat the cream cheese until it’s smooth. Then add the cocoa and sugar. Doesn’t that smell amazing? It becomes like a fluffy chocolate cloud.
Fun fact: The cocoa powder is what makes it taste so deeply chocolatey, not just sweet. Spread this cloud over your cold crust. If it seems soft, don’t worry. A quick chill in the freezer firms it right up.
A Cherry on Top
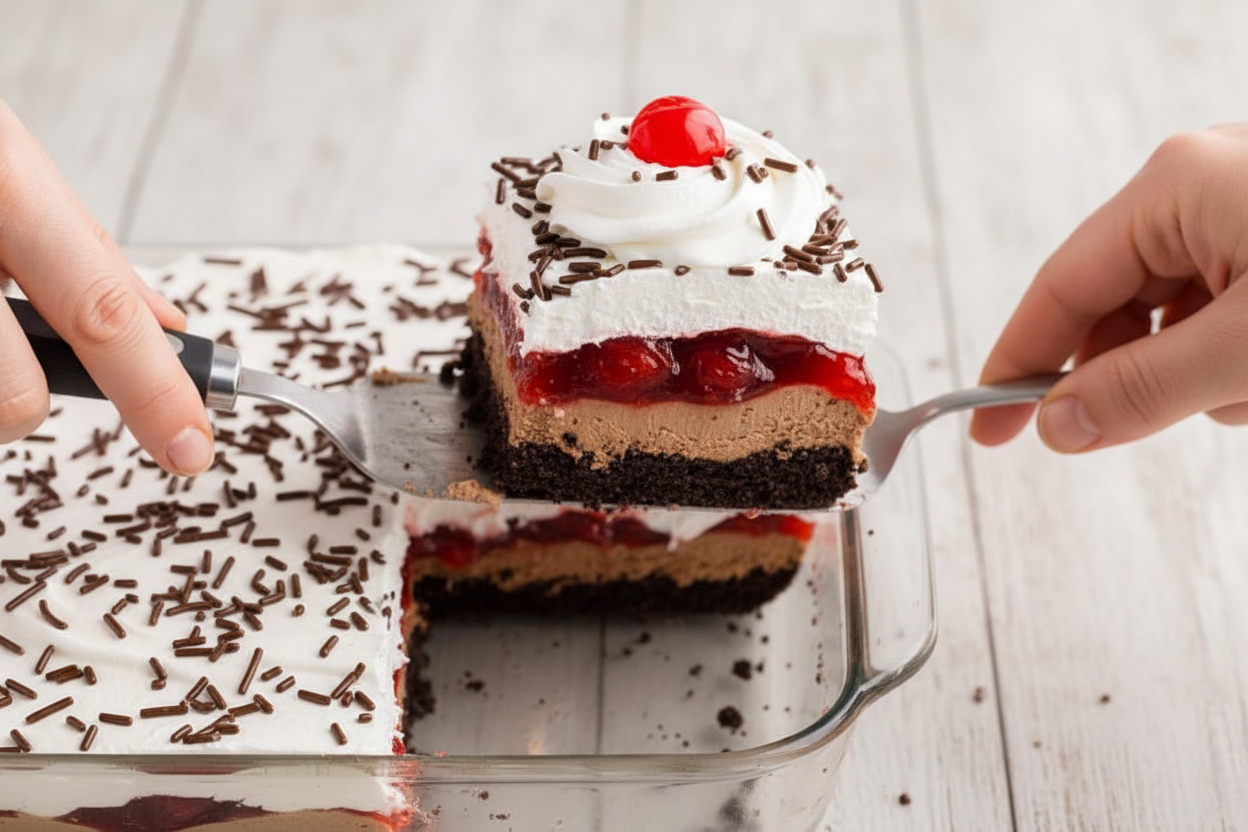
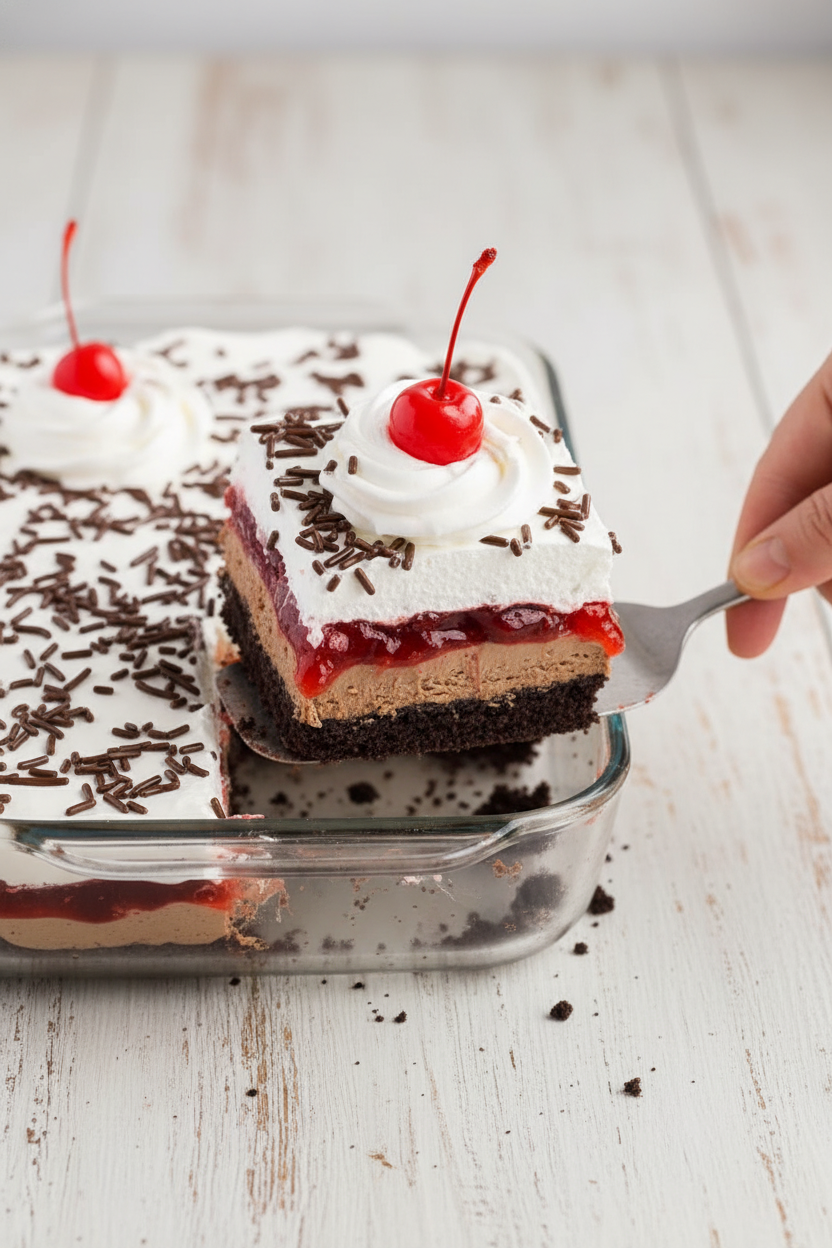
Now for the cherry layer. I use the simple pie filling from a can. It’s a sweet, ruby-red blanket. Then comes the fluffy whipped topping. It looks like snow on top of a cherry mountain.
I love to add sprinkles and a real cherry on top. It makes it special. Do you prefer cherries or another fruit, like strawberries or blueberries?
Why This Matters
This recipe matters for two big reasons. First, it brings people joy. A cool, shared dessert on a hot day is a little piece of happiness.
Second, it shows you don’t need fancy skills. Anyone can make this. Cooking should be fun, not hard. The waiting is the hardest part. You must let it freeze for two hours. It’s worth the wait, I promise.
Your Turn to Share
I’ve shared my story. Now I want to hear yours. Will you try making this lush? Maybe you already have a family favorite like it.
Tell me, what dessert always makes you think of summer? Share your stories with me. I read every single one. It’s like swapping recipes over the garden fence.
Ingredients:
| Ingredient | Amount | Notes |
|---|---|---|
| chocolate sandwich cookies | 14.3 ounces | approximately 36 cookies |
| salted butter, melted | ⅓ cup | plus more for greasing the pan |
| cream cheese | 16 ounces | softened |
| powdered sugar | 1 cup | |
| unsweetened cocoa powder | ¼ cup | |
| vanilla extract | 1 teaspoon | |
| half & half | ½ cup | ⅓ cup whole milk can be substituted |
| cherry pie filling | 42 ounces | |
| frozen whipped topping (cool whip) | 16 ounces | thawed |
| Chocolate sprinkles | optional | |
| maraschino cherries | 16 | optional |
My No-Bake Chocolate Cherry Lush
Hello, dear! Come sit at the counter. Let’s make something magical. This dessert is pure joy in a dish. It reminds me of old-fashioned ice cream parlors. I think you’ll love how easy it is. No oven required at all!
We start with the crust. Step 1: Grease your dish with butter. This little step is so important. It helps every piece slide out later. I use my fingers to spread it. It feels nice and messy.
Now for the fun part. Step 2: Crush those Oreos! I use my food processor. It sounds like a happy thunderstorm. Mix the crumbs with melted butter. It will look like dark, damp sand. (A hard-learned tip: If you don’t have a processor, put cookies in a bag. Let a child roll a can over it! They love that job.)
Step 3: Press the crumbs into your dish. I use a cup to press them flat. Then pop it in the freezer. This chills everything fast. The cold makes a solid foundation. Doesn’t that smell amazing already?
Time for the chocolate layer. Step 4: Beat the cream cheese until it’s smooth. Add the cocoa and sugar. It will look like chocolate frosting. My grandson always tries to sneak a taste here. I still laugh at that.
Step 5: Spread this chocolate dream over the crust. Step 6: Now, the cherry pie filling goes on top. Spoon it gently so you don’t mix the layers. If it feels too soft, just chill it for a bit. Patience is a kitchen virtue, I say.
Almost done! Step 7 & 8: Spread on the whipped topping. Make it nice and smooth. Then add sprinkles for a little sparkle. Step 9: You can pipe pretty swirls with the extra topping. It feels fancy but is so simple. What’s your favorite sprinkle color? Share below!
Step 10: Freeze the whole dish for two hours. This wait is the hardest part. Step 11 & 12: Finally, add a cherry to each swirl. Then slice and serve. The layers will make everyone smile. It’s a perfect make-ahead treat.
Cook Time: 2 hours (freezing)
Total Time: 2 hours 30 minutes
Yield: 12 servings
Category: Dessert, No-Bake
Three Tasty Twists to Try
This recipe is like a best friend. It’s happy to change its outfit! Here are some fun ideas for next time.
The Berry Blast: Use blueberry pie filling instead of cherry. Top with fresh berries. It tastes like a summer morning.
The Cookie Monster: Use mint Oreos for the crust. Keep the chocolate layer. It feels cool and refreshing.
The Peanut Butter Cup: Add two big spoonfuls of peanut butter to the chocolate layer. Use a chocolate whipped topping. Oh my, it’s so good.
Which one would you try first? Comment below!
Serving It Up Sweet
This lush is a star all by itself. But you can make it extra special. Serve it on a pretty plate. A little drizzle of chocolate syrup looks lovely. For a party, cut smaller squares. Everyone can have a perfect little piece.
What to drink with it? For grown-ups, a small glass of ruby port wine is nice. It sips like liquid cherries. For everyone, a cold glass of milk is the classic choice. It cuts the sweetness just right.
Which would you choose tonight?
Keeping Your Lush Perfectly Luscious
This dessert loves the cold. Keep it covered in the fridge for three days. For longer storage, the freezer is your friend. Wrap the whole dish tightly in plastic wrap. It will keep for a month. Just thaw it in the fridge for a few hours before serving.
You can also make individual portions. Layer the ingredients in small cups. This is perfect for parties or lunches. I once made a big batch for a family reunion. Having them pre-portioned saved me so much time. It also meant less mess for everyone.
Storing food well matters. It saves you money and time. You get to enjoy your hard work for days. It also means you always have a sweet treat ready for surprise guests. Have you ever tried storing it this way? Share below!
Simple Fixes for Common Troubles
Is your crust too crumbly? You might need a bit more butter. The crumbs should stick together when you pinch them. I remember when my first crust fell apart. A little extra butter fixed it right up. This matters because a good base holds everything together.
Is the cheesecake layer too runny? Your cream cheese might have been too cold. Let it soften on the counter first. Also, chill the crust before adding this layer. A firm crust gives you a stable start. This helps you spread the next layers neatly.
Are your layers mixing together? Chill the dish between each step. Fifteen minutes in the freezer makes a big difference. This patience gives you beautiful, distinct layers. It makes the dessert look as good as it tastes. Which of these problems have you run into before?
Your Quick Questions, Answered
Q: Can I make this gluten-free? A: Yes! Use gluten-free chocolate sandwich cookies for the crust.
Q: How far ahead can I make it? A: Make it up to two days ahead. Keep it covered in the fridge.
Q: What can I use instead of half & half? A: You can use all whole milk. The filling will be a little lighter.
Q: Can I make a smaller batch? A: Absolutely. Just halve all the ingredients. Use an 8×8 inch dish.
Q: Are the toppings needed? A: No, they are just for fun. The dessert is delicious without them. *Fun fact: Maraschino cherries were originally preserved in a liqueur called Marasca!* Which tip will you try first?
Share Your Sweet Creation
I hope you love making this no-bake treat. It always brings a smile to my table. I would love to see your version. Sharing food connects us all. It is my favorite part of cooking.
Please show me your beautiful Chocolate Cherry Lush. Have you tried this recipe? Tag us on Pinterest! Your pictures might inspire another young cook. Thank you for spending time in my kitchen today.
Happy cooking!
—Emma Caldwell.
No Bake Chocolate Cherry Lush: No Bake Chocolate Cherry Lush Dessert
Description
No bake chocolate cherry lush dessert! Easy layered treat with cream cheese, pudding, cherries & whipped cream. Perfect for summer or holidays.
Ingredients
=== Oreo Crust ===
=== Chocolate Cheesecake Layer ===
=== Other Layers ===
Instructions
- Grease a 9×13-inch glass baking dish with butter and set aside.
- In the bowl of a food processor, pulverize the Oreo cookies until small even crumbs form. Add the melted butter to the cookie crumbs and pulse until combined.
- Press the crust mixture into the prepared baking dish and place it in the freezer to chill while preparing the next layer.
- With a hand mixer, beat together cream cheese, powdered sugar, cocoa powder, vanilla extract, and the cream. Continue beating until the mixture is smooth and fluffy.
- Spread the chocolate cheesecake layer over the chilled crust.
- Use a spatula to carefully spread the cherry pie filling evenly over the cheesecake layer (if the cheesecake layer appears too soft, you can chill the dish in the freezer for 15 minutes or so between each layer to help firm up the surface).
- Top with the Cool Whip, reserving about a cup to pipe swirls on top of the lush if you wish.
- Spread the Cool Whip smooth. Sprinkle with chocolate sprinkles.
- Use a piping bag and tip #1M to pipe soft swirls of Cool Whip on top of the lush.
- Place the lush in the freezer to firm up for at least 2 hours.
- Gently place a cherry on top of each piped swirl.
- Cut into pieces and serve.
Notes
- For best results, ensure the cream cheese is fully softened for a smooth cheesecake layer. The dessert can be stored covered in the freezer for up to a week.


Leave a Reply