
A Rainbow in a Pan
Hello, my dear. Come sit. Let’s make something joyful today. We are making Spring Marshmallow Crispy Squares. They are like a rainbow you can eat.
We use those cute little PEEPS chicks. You know, the marshmallow birds. We will sort them by color. Pink, blue, green, and yellow. Doesn’t that look cheerful already? I think food should make you smile first.
Why We Sort the Colors
You must work with one color at a time. This matters. It keeps our rainbow layers bright and separate. If we mix all the colors at once, we get a muddy brown rainbow. And nobody wants that.
It teaches a little lesson. Good things take patience. Doing one step well leads to a prettier finish. I learned this with my first layered jelly cake. It was a purple blob! I still laugh at that.
The Magic of Melting
Now, the fun part. We melt the PEEPS with butter and marshmallows. Watch them in the microwave. They puff up into a fluffy, colorful cloud. Doesn’t that smell amazing? Like sweet vanilla sunshine.
Then you stir. You must stir fast. The mixture is hot and eager to set. Fold in the crispy cereal until every piece wears a coat of color. This is the best part. What color would you want to make first?
Building Your Layers
We press the green layer into the pan first. Use your hands. Feel the warm, sticky treat. Then make the yellow, blue, and pink. Gently press each new layer on top.
You are building a treat tower. Press it down gently but firmly. This matters. It helps all the layers stick together as friends. Then the whole pan goes to chill. The waiting is hard, I know.
A Sweet Little Story
I first made these for my granddaughter’s spring party. The children’s eyes got so wide. They couldn’t decide which color to try first. One little boy ate his square layer by layer. He saved the blue for last.
It made me so happy. Food is a memory maker. Fun fact: The first PEEPS were made by hand! It took 27 hours. Now machines can make them in 6 minutes. Isn’t that something?
Time to Share & Slice
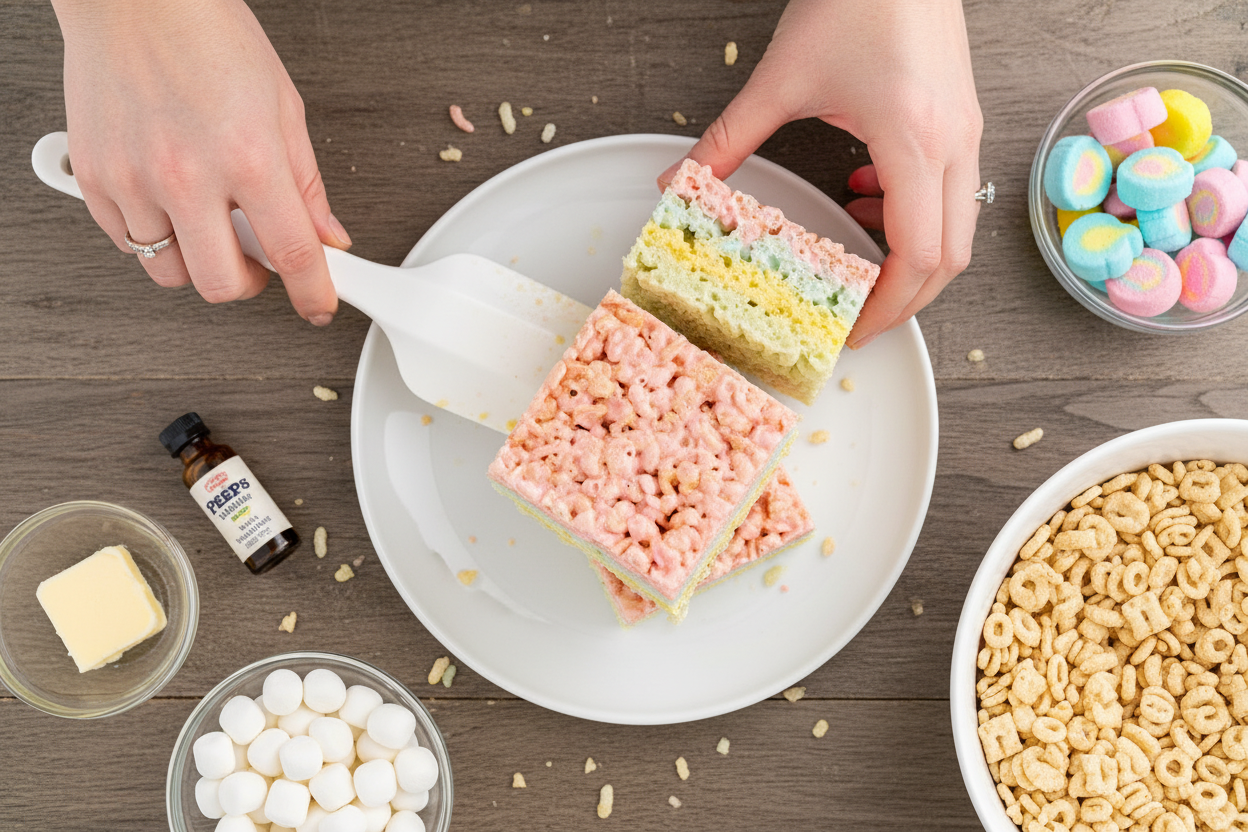
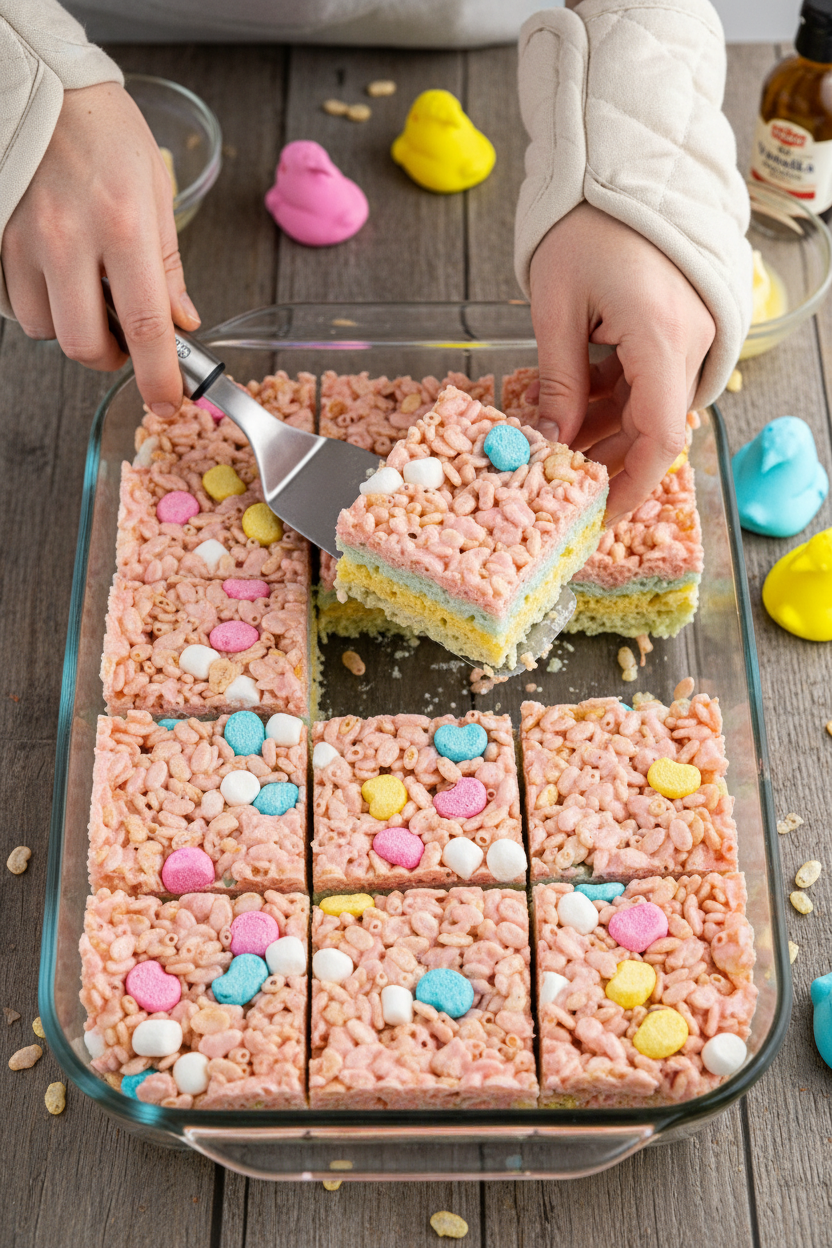
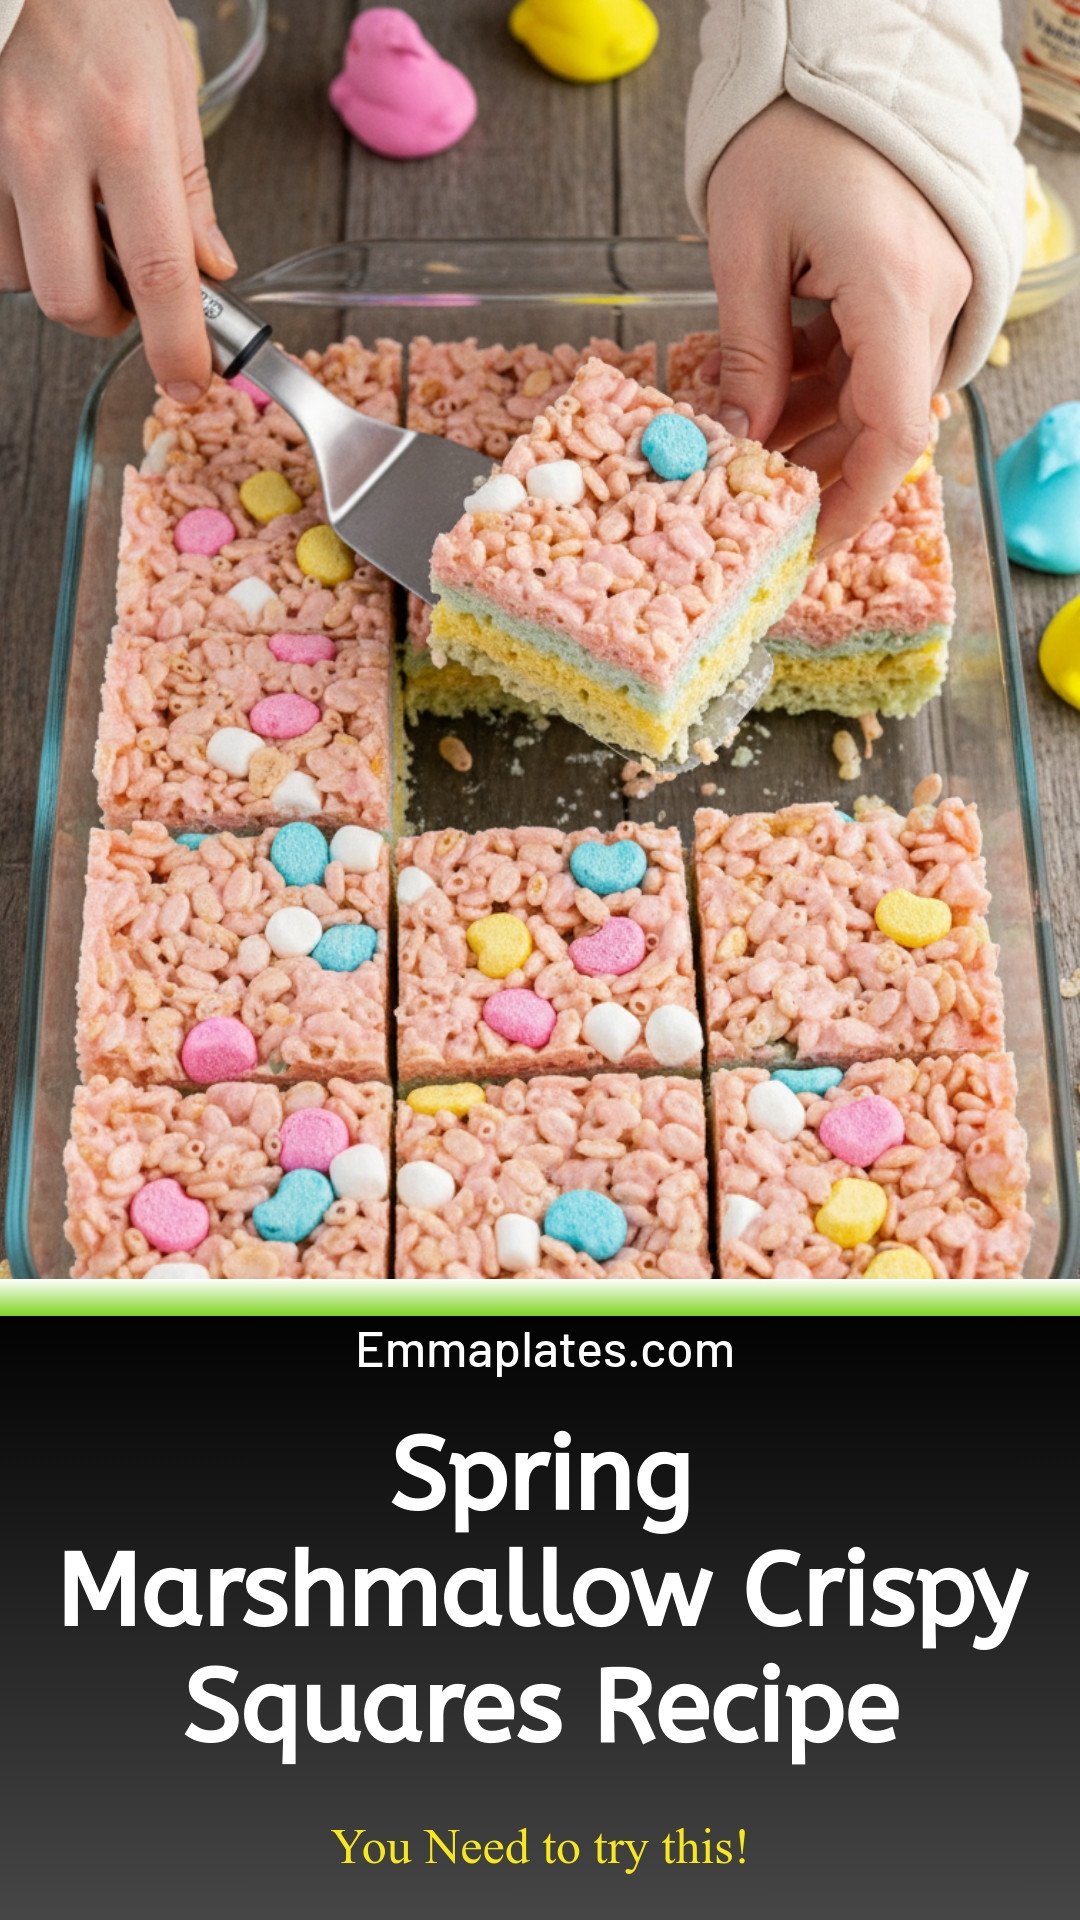
After thirty minutes, it’s time. Lift your squares from the pan. Slice them into bars. Look at those beautiful stripes. Each one is a little piece of spring.
Share them with someone you like. See their smile. That’s the whole point of cooking, really. Tell me, what is your favorite spring treat to make? Do you think these would be a hit at your next gathering?

Ingredients:
| Ingredient | Amount | Notes |
|---|---|---|
| PEEPS Rainbow pops | 8 pops (1.38-ounce each) | 4 colors of peeps in each pop – pink, blue, green & yellow |
| Mini marshmallows | 2 cups | Divided into four ½-cup portions |
| Salted butter | ¾ cup | Room temperature, divided into four 3-tablespoon portions |
| Vanilla extract | 2 teaspoons | Divided into four ½-teaspoon portions |
| Rice Krispies cereal | 8 cups | Divided into four 2-cup portions |
Spring’s Sweetest Rainbow Treat
Hello, my dear! Come sit at the table. I want to tell you about a springtime kitchen memory. My grandson, Leo, once brought me a whole bouquet of those colorful PEEPS chicks. He said they looked like a garden. So, we decided to plant a rainbow in a baking pan! The result was these joyful, layered squares. They are just as fun to make as they are to eat. Doesn’t that sound like a lovely bit of fun?
Now, let’s make our rainbow. First, get everything ready. Trust me, you’ll want it all within arm’s reach. This recipe moves quickly, like a spring shower! Spray your 9×13 pan lightly. Sort your PEEPS by color into four little piles. I still laugh at how sticky my fingers get. It’s part of the charm.
Step 1: Grab a microwave-safe bowl. Put in the green PEEPS, ½ cup mini marshmallows, and 3 tablespoons butter. Heat it for about 45 seconds. Watch it puff up! It smells amazing, like sweet vanilla clouds. Stir in that ½ teaspoon of vanilla until it’s smooth and green.
Step 2: Now, fold in 2 cups of cereal. Mix gently until every piece is wearing its green marshmallow coat. (My hard-learned tip: Use a little butter on your hands before the next step. It keeps the sticky away!). Press this green layer into the bottom of your pan. Make it nice and even.
Step 3: Wash that bowl, or grab a clean one. Repeat everything with the yellow PEEPS. Spread the yellow layer right on top of the green. Press it down gently. Can you guess which color comes next? Share below!
Step 4: You’re a pro now! Do the blue layer, then finish with the pretty pink. Gently press the top. See your rainbow? Pop the whole pan in the fridge for 30 minutes. This lets the layers set. Then, slice into squares and share your garden of treats.
Cook Time: 30 minutes (plus chilling)
Total Time: 1 hour
Yield: 12 squares
Category: Dessert, Snack
Make It Your Own Rainbow
The best recipes are ones you can play with. Here are three sunny twists for your next batch. I think they are all delightful.
Chocolate Drizzle: Melt some chocolate chips. Drizzle it over the top layer before it chills. It looks so fancy.
Confetti Surprise: Add a handful of rainbow sprinkles to each colored layer. It makes the squares even more cheerful.
Berry Blast: Use a few drops of strawberry or raspberry extract with the pink layer. It gives a real fruit flavor.
Which one would you try first? Comment below!
Serving Your Sunny Squares
These squares are a celebration all by themselves. But I love making a plate feel special. For a party, place each square in a colorful paper liner. You could add a fresh strawberry or a blackberry on the side. It looks so pretty on a picnic table.
What to drink? For a grown-up sip, a glass of cold Prosecco is lovely. Its bubbles cut through the sweetness. For everyone, a tall glass of icy lemonade or frosty milk is perfect. The tart lemonade is my favorite pairing. It just tastes like spring.
Which would you choose tonight?
Keeping Your Spring Squares Fresh
These colorful squares are best eaten in a day or two. Keep them in the baking pan. Just cover it tightly with plastic wrap. They will stay soft on your counter.
You can freeze them for a special treat later. Cut the big slab into squares first. Wrap each square in a little parchment paper. Then pop them all into a freezer bag.
I once froze a batch for my grandson’s surprise visit. His smile was worth the wait! Freezing lets you save joy for a rainy day. That is why it matters.
Have you ever tried storing it this way? Share below!
Fixing Common Crispy Square Troubles
Is your marshmallow mix too stiff? Your butter might be too cold. I remember when mine seized up once. Just microwave it for 10 more seconds. It will become smooth again.
Are the layers not sticking together? Press each layer gently but firmly. Use your clean hands or a greased spatula. This helps them become one solid, colorful bar.
Are the squares too hard? You may have cooked the marshmallows too long. They only need 45-60 seconds to melt. Getting it right builds your kitchen confidence. It also makes for a perfectly chewy treat.
Which of these problems have you run into before?
Your Quick Questions, Answered
Q: Can I make these gluten-free? A: Yes! Use a certified gluten-free crispy rice cereal.
Q: Can I make them ahead? A: Absolutely. Make them the night before your party.
Q: What if I don’t have Peeps? A: Use all mini marshmallows. Add a few drops of food coloring.
Q: Can I double the recipe? A: I would make two separate batches. It is easier to manage.
Q: Any optional tips? A: Sprinkle extra mini marshmallows on top for fun. Fun fact: The first Rice Krispie treat was made in 1939!
Which tip will you try first?
Share Your Springtime Creations
I hope you have fun making these rainbow layers. Cooking should be full of color and laughter. I would love to see what you create in your kitchen.
Your version might inspire another young cook. So please, share your pictures with our community. It makes my day to see them.
Have you tried this recipe? Tag us on Pinterest!
Happy cooking!
—Emma Caldwell.
Spring Marshmallow Crispy Squares: Spring Marshmallow Crispy Squares Recipe
Description
Easy no-bake spring dessert! Colorful marshmallow crispy squares with pastel sprinkles. A fun, festive treat for Easter or spring parties.
Ingredients
Instructions
- Spray a 9×13-inch baking pan with baking spray and set aside. Prepare all your ingredients before you start making these Peeps Rice Krispie squares because you will need to work quickly with each peeps color batch.
- You will need 4 medium-sized microwave-safe mixing bowls for this recipe. If you only have one or two mixing bowls, then you will need to wash the bowls between mixing each colored batch of marshmallow Peeps. Remove the Peeps from their lollipop stick and sort them into colors.
- To a medium-sized microwave-safe bowl, add ½ cup of mini marshmallows, 3 tablespoons of butter, and all 8 green Peeps. Microwave on high for 45 seconds to 1 minute. Add ½ teaspoon vanilla extract and stir to completely combine all the ingredients into a smooth consistency.
- Fold in 2 cups of Rice Krispie cereal until all the cereal is coated in the colored marshmallow mixture.
- Layer the green-colored marshmallow coated Rice Krispie cereal mixture into the bottom of the prepared baking dish. Using your hands, gently press the mixture into an even layer.
- Repeat steps 2 and 3 for the yellow-colored Peeps followed by the blue Peeps and pink Peeps until you have 4 layers of Peeps-colored Rice Krispie cereal layered one on top of the other. Gently press down on the final layer to make sure that your Peeps Rice Krispie squares are tightly packed.
- Place the baking dish into the refrigerator for 30 minutes to allow the Peeps Rice Krispies to cool and set completely before slicing and serving them.
Notes
- For a quicker version, you can mix all the Peeps colors together at once, but the layers will be a blended pastel color instead of distinct stripes.


Leave a Reply