

Your Questions Answered
Q: Can I make this gluten-free?
A: Yes. Use gluten-free flour instead of all-purpose flour. The recipe already works well with it.
Q: Can I prepare the topping ahead of time?
A: Absolutely. Mix the dry ingredients in a bag. Store it in the pantry for up to a week.
Q: What if I don’t have quick oats?
A: Use rolled oats. Just pulse them in a blender for a few seconds to break them down.
Q: How do I scale the recipe for more people?
A: Simply double or triple the ingredients. Use one apple half per person as a serving.
Q: Can I add nuts or dried fruit?
A: Yes. Fold in chopped walnuts or raisins with the oat mixture for extra crunch. Which tip will you try first?
A Warm Send-Off from Emma
I hope these baked apples bring warmth to your kitchen. They are simple, sweet, and full of cozy memories. My own grandmother used to make them on rainy afternoons. The smell of cinnamon filled the whole house. *Fun fact: Baked apples were a favorite treat in colonial America too.* I would love to see your results. Have you tried this recipe? Tag us on Pinterest! Share your photos and stories with us. Happy cooking!
—Emma Caldwell.
Delightfully Baked Apples: Delightful Baked Apples A Simple Recipe
Description
Delightfully baked apples recipe: warm, tender, cinnamon-spiced fruit, naturally sweet & healthy. Perfect easy fall dessert.
Ingredients
Instructions
- Preheat oven to 350ºF.
- Cut apples in half and remove core and seeds with a small pairing knife or spoon.
- In a small bowl combine butter, brown sugar, flour, oats and cinnamon. Spoon on top of the apple halves and sprinkle with cinnamon.
- Place on a cookie sheet and bake in the oven for 30 minutes.
- Serve warm with a scoop of ice cream if desired.
Common Problems and Easy Fixes
Sometimes your baked apples turn out mushy. This happens when you bake them too long. Check them at twenty-five minutes instead of thirty. The apples should be tender but still hold their shape. I remember ruining a whole batch once. They turned into applesauce! Now I always peek into the oven early. Another issue is the topping falling off. Press the oat mixture firmly onto each apple half. Use a spoon to pat it down. This helps it stick while baking. A third problem is bland flavor. Do not skip the cinnamon. Sprinkle a pinch extra on top before baking. Fixing these small mistakes makes you a better cook. You learn to trust your eyes and nose. This matters because cooking with confidence tastes better. Which of these problems have you run into before?
Your Questions Answered
Q: Can I make this gluten-free?
A: Yes. Use gluten-free flour instead of all-purpose flour. The recipe already works well with it.
Q: Can I prepare the topping ahead of time?
A: Absolutely. Mix the dry ingredients in a bag. Store it in the pantry for up to a week.
Q: What if I don’t have quick oats?
A: Use rolled oats. Just pulse them in a blender for a few seconds to break them down.
Q: How do I scale the recipe for more people?
A: Simply double or triple the ingredients. Use one apple half per person as a serving.
Q: Can I add nuts or dried fruit?
A: Yes. Fold in chopped walnuts or raisins with the oat mixture for extra crunch. Which tip will you try first?
A Warm Send-Off from Emma
I hope these baked apples bring warmth to your kitchen. They are simple, sweet, and full of cozy memories. My own grandmother used to make them on rainy afternoons. The smell of cinnamon filled the whole house. *Fun fact: Baked apples were a favorite treat in colonial America too.* I would love to see your results. Have you tried this recipe? Tag us on Pinterest! Share your photos and stories with us. Happy cooking!
—Emma Caldwell.
Ingredients:
| Ingredient | Amount | Notes |
|---|---|---|
| Large apples | 2 | Cut in half |
| Butter | 2 tbsp | Melted |
| Brown sugar | 2 tbsp | Unpacked |
| All purpose or gluten-free flour | 2 tbsp | |
| Quick oats | 4 tbsp | |
| Cinnamon | Pinch |
My First Baked Apple Memory
I still remember the first time I made baked apples. I was maybe your age, standing on a little stool in my grandma’s kitchen. The whole house smelled like cinnamon and warm butter. Doesn’t that smell amazing?
This recipe is so simple you could teach it to a friend in five minutes. It uses apples you probably have in the fridge and a few pantry staples. The best part? You get a warm, soft, sweet treat that feels like a hug in a bowl.
I love how the oats get a little crunchy on top while the apple gets all tender. It is like having dessert, but you are also eating fruit. That is what I call a win-win. Let me walk you through it, step by step.
Let’s Bake Some Apples Together
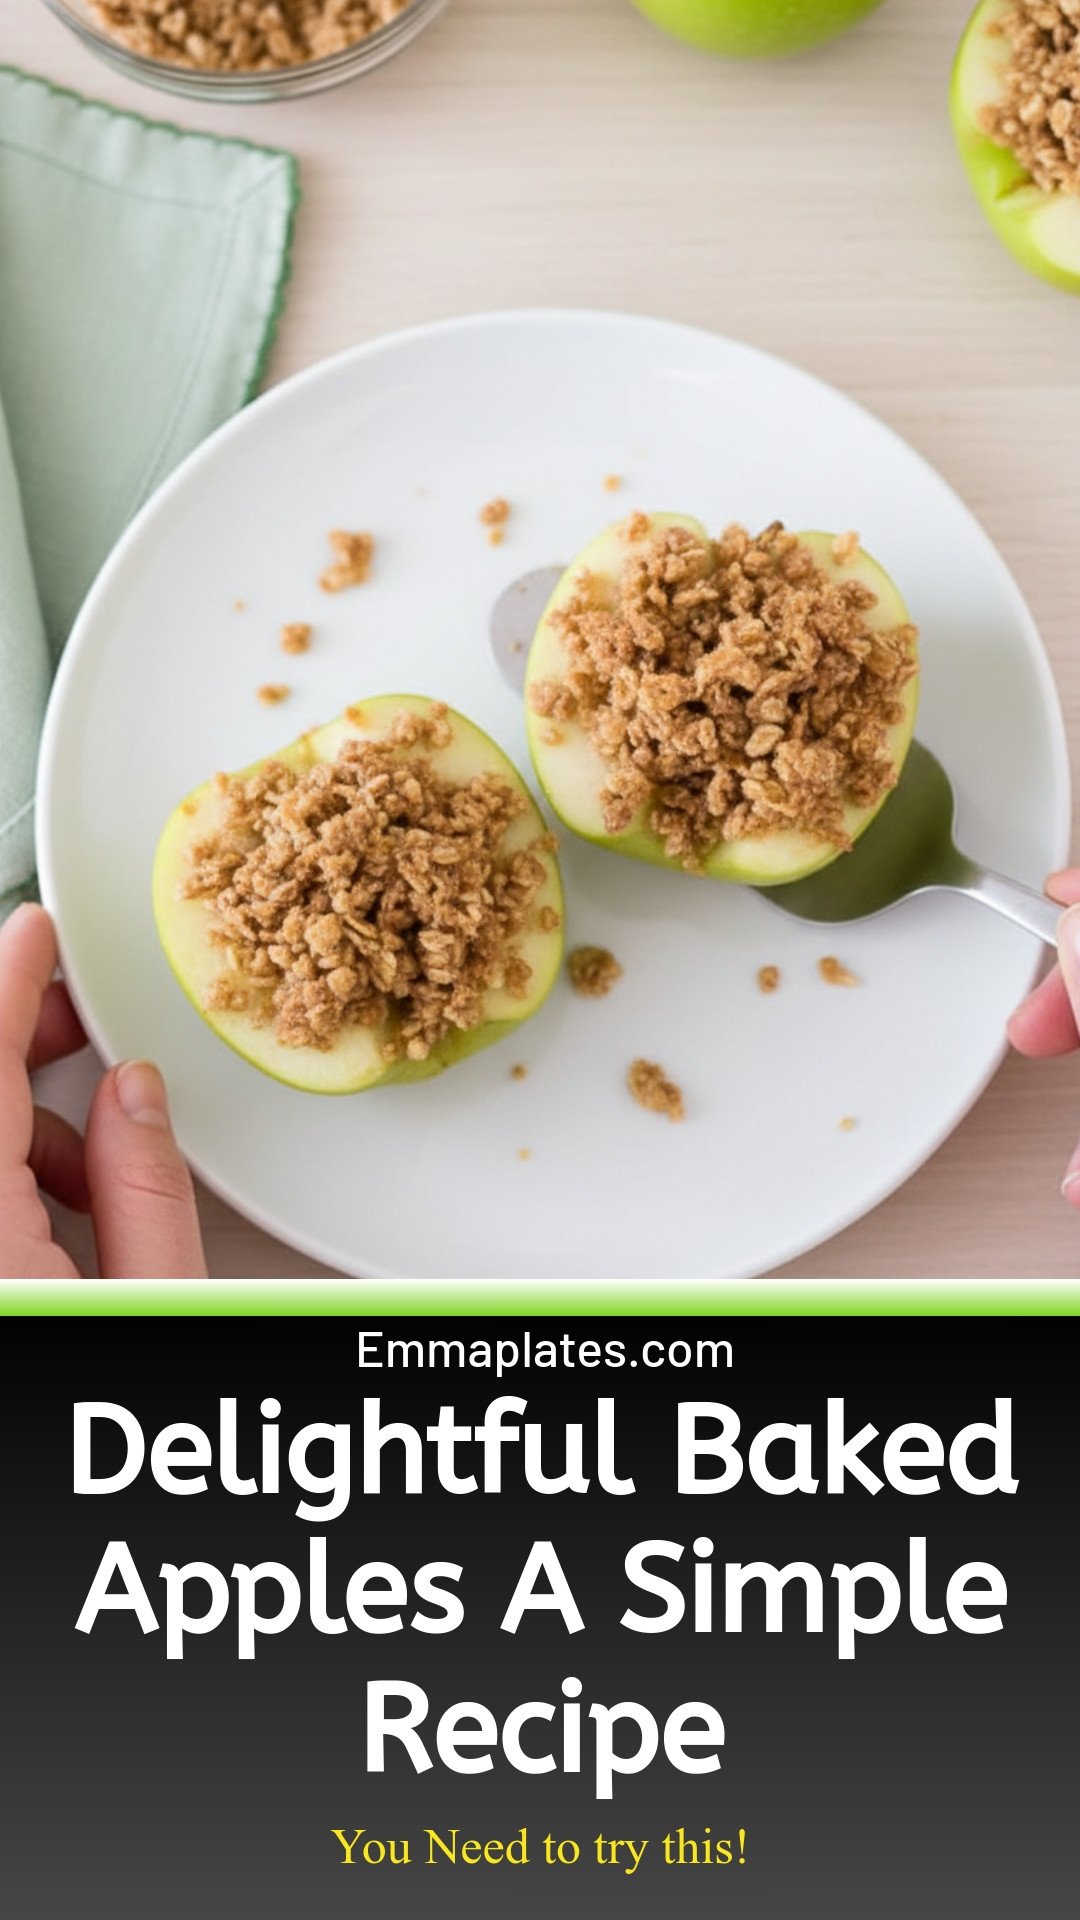
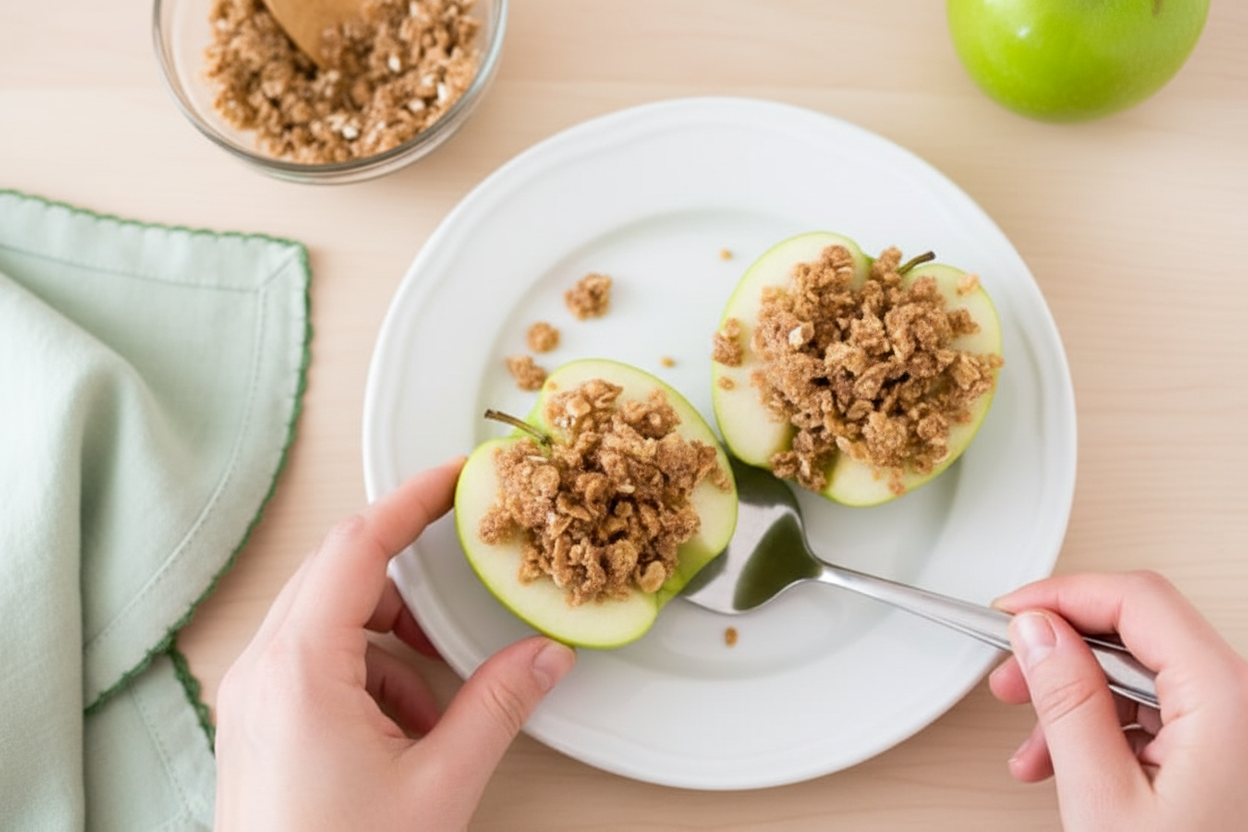
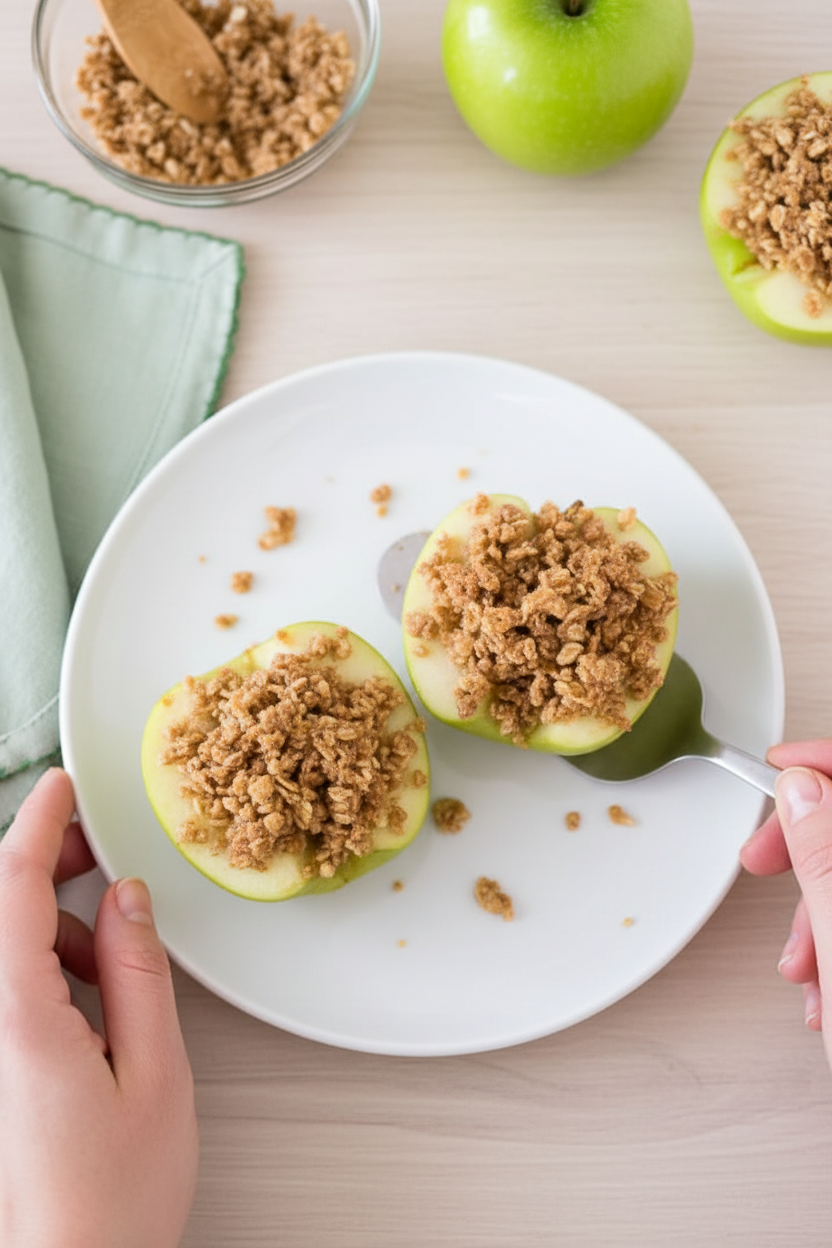
Step 1: Preheat your oven to 350ºF. While it heats up, grab two large apples. I like using Fuji or Honeycrisp because they stay sweet. Cut each apple in half, right through the middle.
Step 2: Now you need to take out the core and seeds. Use a small paring knife or even a sturdy spoon. Just scoop out the little star-shaped center. (Here is a hard-learned tip: Do not carve too deep or you will lose the good apple flesh. Just a gentle scoop is perfect.)
Step 3: In a small bowl, mix together your melted butter, brown sugar, flour, quick oats, and a pinch of cinnamon. Stir it with a fork until it looks like crumbly sand. I always sneak a tiny taste of the topping. It is so good raw, too.
Step 4: Spoon that lovely oat mixture right on top of each apple half. Do not be shy about piling it on. Sprinkle a little extra cinnamon over the top, just for fun. Place them on a cookie sheet, cut side up.
Step 5: Bake for 30 minutes. Your kitchen will start to smell like fall in a cozy cabin. The apples will be soft and the topping golden brown. Let them cool for just a minute or two. What is your favorite kind of apple for baking? Share below!
Cook Time: 30 minutes
Total Time: 40 minutes
Yield: 4 servings (1 half per person)
Category: Dessert
Three Fun Twists to Try
Peanut Butter & Honey: Swap the butter for peanut butter and use honey instead of brown sugar. It tastes like a warm, gooey candy bar.
Spiced Cranberry: Toss a handful of dried cranberries into the oat mix. Add a tiny pinch of nutmeg for a holiday twist that pops.
Maple Pecan Crunch: Use maple syrup in place of brown sugar and sprinkle chopped pecans on top. It gets extra crunchy and tastes like Saturday morning pancakes. Which one would you try first? Comment below!
How to Serve and Sip
I like to serve these apples warm with a big scoop of vanilla ice cream melting right over the top. You can also drizzle a little caramel sauce for extra sweetness. A sprinkle of granola on top adds more crunch.
For a drink, pour a tall glass of cold milk. It is the perfect partner for warm, spiced apples. If you are serving grown-ups, a cup of hot apple cider or even a light rum-spiked cider is lovely. Which would you choose tonight?
Storing Your Baked Apples for Later
These baked apples are perfect for making ahead. Let them cool fully before storing. Place them in an airtight container in the fridge. They will stay fresh for up to four days. I once stored a batch and forgot about them until breakfast. They tasted even better the next morning! For the freezer, wrap each apple half tightly in plastic wrap. Then put them in a freezer bag. They last for up to three months. To reheat, pop them in a 350-degree oven for ten minutes. You can also use the microwave for thirty seconds. Batch cooking saves time on busy nights. It means you always have a warm treat ready. Have you ever tried storing it this way? Share below!
Common Problems and Easy Fixes
Sometimes your baked apples turn out mushy. This happens when you bake them too long. Check them at twenty-five minutes instead of thirty. The apples should be tender but still hold their shape. I remember ruining a whole batch once. They turned into applesauce! Now I always peek into the oven early. Another issue is the topping falling off. Press the oat mixture firmly onto each apple half. Use a spoon to pat it down. This helps it stick while baking. A third problem is bland flavor. Do not skip the cinnamon. Sprinkle a pinch extra on top before baking. Fixing these small mistakes makes you a better cook. You learn to trust your eyes and nose. This matters because cooking with confidence tastes better. Which of these problems have you run into before?
Your Questions Answered
Q: Can I make this gluten-free?
A: Yes. Use gluten-free flour instead of all-purpose flour. The recipe already works well with it.
Q: Can I prepare the topping ahead of time?
A: Absolutely. Mix the dry ingredients in a bag. Store it in the pantry for up to a week.
Q: What if I don’t have quick oats?
A: Use rolled oats. Just pulse them in a blender for a few seconds to break them down.
Q: How do I scale the recipe for more people?
A: Simply double or triple the ingredients. Use one apple half per person as a serving.
Q: Can I add nuts or dried fruit?
A: Yes. Fold in chopped walnuts or raisins with the oat mixture for extra crunch. Which tip will you try first?
A Warm Send-Off from Emma
I hope these baked apples bring warmth to your kitchen. They are simple, sweet, and full of cozy memories. My own grandmother used to make them on rainy afternoons. The smell of cinnamon filled the whole house. *Fun fact: Baked apples were a favorite treat in colonial America too.* I would love to see your results. Have you tried this recipe? Tag us on Pinterest! Share your photos and stories with us. Happy cooking!
—Emma Caldwell.
A Sweet Memory from My Kitchen
I still remember the first time I made baked apples. I was a young girl, maybe your age. My grandmother handed me a paring knife and said, “Careful now, slow and steady.” I was so nervous I nearly dropped the apple. We laughed about that for years. Doesn’t that smell amazing when they bake? The whole kitchen fills with the scent of cinnamon and warm fruit. It’s like a hug for your nose. This recipe is a little piece of that memory. It is simple enough for a beginner to make. You just need a few things from your pantry. I love that it feels fancy, but it’s really just apples and oats. Have you ever baked a fruit before? It changes everything.The Secret to a Perfect Apple
Picking the right apple is important. You want one that is firm and a little tart. Granny Smith apples are my favorite for this recipe. They hold their shape when they bake. If you use a soft apple, it might turn into applesauce. That is okay too, but we want slices, not sauce. When you cut the apple in half, look at the core. It looks like a little star. You can scoop it out with a spoon. Be gentle so you don’t break the walls of the apple. That little boat will hold all the sweet, buttery topping. *Fun fact: Apples float in water because they are 25% air.* That is why they bob around in a big bowl.Why We Cook with Oats
Oats are not just for breakfast oatmeal. They are little helpers in the kitchen. In this recipe, they soak up the butter and sugar. They become soft and chewy like a tiny cookie on top of the apple. This matters because it adds texture. You get a crunch on top and a soft, warm apple underneath. Quick oats are best here. They cook fast and blend easily. You could use old-fashioned oats too, but they take a little longer. If you have a gluten allergy, just swap the flour. Use your favorite gluten-free kind. It works the same way. I love that this recipe is flexible. What do you like on top of a baked apple? A scoop of ice cream? A drizzle of honey? Let me know.The Easy Steps to Make It
First, turn your oven to 350 degrees. That is a warm but not hot oven. While it heats up, wash your apples. Cut them in half from top to bottom. Use a small knife to cut out the core and seeds. My grandmother always said, “Watch your fingers, not the bird outside.” I still laugh at that. In a small bowl, mix the melted butter, brown sugar, flour, oats, and a pinch of cinnamon. Stir it with a fork until it looks like wet sand. Spoon that mixture onto each apple half. Do not be shy. Pile it high. Sprinkle a little extra cinnamon on top. Place them on a cookie sheet and bake for 30 minutes. The smell will tell you when they are ready.A Warm Treat for Any Day
These baked apples are good for so many reasons. They are a dessert, but they are also a little healthy. Each half has 154 calories and 3 grams of fiber. That fiber comes from the apple and the oats. This matters because fiber helps your belly feel full and happy. It is a sweet treat that does not leave you feeling heavy. You can eat them for breakfast too. Just skip the ice cream and add a spoonful of yogurt. Or eat them plain with a fork. They are warm and soft, like a baked hug. I like to eat mine in a bowl so I can catch all the juice. Do you eat desserts for breakfast sometimes? It is a secret habit many of us share.How to Make It Your Own
Everyone has a different taste. That is what makes cooking fun. You can add a handful of raisins to the topping. Or swap the brown sugar for maple syrup. If you like nuts, chop some walnuts and mix them in. Just don’t add too much or the topping will be dry. You want it to stay a little sticky. I once made these for a friend who did not like cinnamon. I used a pinch of nutmeg instead. It was still delicious. The best part is you are the chef. You decide what goes in. If you try a new flavor, tell me about it. I would love to hear what you come up with. That is how recipes grow and become family favorites.A Simple Joy Worth Sharing
When the apples come out of the oven, let them cool for a minute. The topping will be hot and sticky. Serve them warm with a scoop of vanilla ice cream if you like. The cold ice cream on the warm apple is a little bit of magic. It melts into the oats and makes everything creamy. I hope you make these for someone you love. Or just for yourself on a quiet afternoon. That matters too. Taking time to make something nice for yourself is a way of saying, “I matter.” So grab an apple, preheat the oven, and give it a try. Which part of the recipe do you think is the trickiest? I bet it is easier than you think.Ingredients:
| Ingredient | Amount | Notes |
|---|---|---|
| Large apples | 2 | Cut in half |
| Butter | 2 tbsp | Melted |
| Brown sugar | 2 tbsp | Unpacked |
| All purpose or gluten-free flour | 2 tbsp | |
| Quick oats | 4 tbsp | |
| Cinnamon | Pinch |
My First Baked Apple Memory
I still remember the first time I made baked apples. I was maybe your age, standing on a little stool in my grandma’s kitchen. The whole house smelled like cinnamon and warm butter. Doesn’t that smell amazing?
This recipe is so simple you could teach it to a friend in five minutes. It uses apples you probably have in the fridge and a few pantry staples. The best part? You get a warm, soft, sweet treat that feels like a hug in a bowl.
I love how the oats get a little crunchy on top while the apple gets all tender. It is like having dessert, but you are also eating fruit. That is what I call a win-win. Let me walk you through it, step by step.
Let’s Bake Some Apples Together
Step 1: Preheat your oven to 350ºF. While it heats up, grab two large apples. I like using Fuji or Honeycrisp because they stay sweet. Cut each apple in half, right through the middle.
Step 2: Now you need to take out the core and seeds. Use a small paring knife or even a sturdy spoon. Just scoop out the little star-shaped center. (Here is a hard-learned tip: Do not carve too deep or you will lose the good apple flesh. Just a gentle scoop is perfect.)
Step 3: In a small bowl, mix together your melted butter, brown sugar, flour, quick oats, and a pinch of cinnamon. Stir it with a fork until it looks like crumbly sand. I always sneak a tiny taste of the topping. It is so good raw, too.
Step 4: Spoon that lovely oat mixture right on top of each apple half. Do not be shy about piling it on. Sprinkle a little extra cinnamon over the top, just for fun. Place them on a cookie sheet, cut side up.
Step 5: Bake for 30 minutes. Your kitchen will start to smell like fall in a cozy cabin. The apples will be soft and the topping golden brown. Let them cool for just a minute or two. What is your favorite kind of apple for baking? Share below!
Cook Time: 30 minutes
Total Time: 40 minutes
Yield: 4 servings (1 half per person)
Category: Dessert
Three Fun Twists to Try
Peanut Butter & Honey: Swap the butter for peanut butter and use honey instead of brown sugar. It tastes like a warm, gooey candy bar.
Spiced Cranberry: Toss a handful of dried cranberries into the oat mix. Add a tiny pinch of nutmeg for a holiday twist that pops.
Maple Pecan Crunch: Use maple syrup in place of brown sugar and sprinkle chopped pecans on top. It gets extra crunchy and tastes like Saturday morning pancakes. Which one would you try first? Comment below!
How to Serve and Sip
I like to serve these apples warm with a big scoop of vanilla ice cream melting right over the top. You can also drizzle a little caramel sauce for extra sweetness. A sprinkle of granola on top adds more crunch.
For a drink, pour a tall glass of cold milk. It is the perfect partner for warm, spiced apples. If you are serving grown-ups, a cup of hot apple cider or even a light rum-spiked cider is lovely. Which would you choose tonight?
Storing Your Baked Apples for Later
These baked apples are perfect for making ahead. Let them cool fully before storing. Place them in an airtight container in the fridge. They will stay fresh for up to four days. I once stored a batch and forgot about them until breakfast. They tasted even better the next morning! For the freezer, wrap each apple half tightly in plastic wrap. Then put them in a freezer bag. They last for up to three months. To reheat, pop them in a 350-degree oven for ten minutes. You can also use the microwave for thirty seconds. Batch cooking saves time on busy nights. It means you always have a warm treat ready. Have you ever tried storing it this way? Share below!
Common Problems and Easy Fixes
Sometimes your baked apples turn out mushy. This happens when you bake them too long. Check them at twenty-five minutes instead of thirty. The apples should be tender but still hold their shape. I remember ruining a whole batch once. They turned into applesauce! Now I always peek into the oven early. Another issue is the topping falling off. Press the oat mixture firmly onto each apple half. Use a spoon to pat it down. This helps it stick while baking. A third problem is bland flavor. Do not skip the cinnamon. Sprinkle a pinch extra on top before baking. Fixing these small mistakes makes you a better cook. You learn to trust your eyes and nose. This matters because cooking with confidence tastes better. Which of these problems have you run into before?
Your Questions Answered
Q: Can I make this gluten-free?
A: Yes. Use gluten-free flour instead of all-purpose flour. The recipe already works well with it.
Q: Can I prepare the topping ahead of time?
A: Absolutely. Mix the dry ingredients in a bag. Store it in the pantry for up to a week.
Q: What if I don’t have quick oats?
A: Use rolled oats. Just pulse them in a blender for a few seconds to break them down.
Q: How do I scale the recipe for more people?
A: Simply double or triple the ingredients. Use one apple half per person as a serving.
Q: Can I add nuts or dried fruit?
A: Yes. Fold in chopped walnuts or raisins with the oat mixture for extra crunch. Which tip will you try first?
A Warm Send-Off from Emma
I hope these baked apples bring warmth to your kitchen. They are simple, sweet, and full of cozy memories. My own grandmother used to make them on rainy afternoons. The smell of cinnamon filled the whole house. *Fun fact: Baked apples were a favorite treat in colonial America too.* I would love to see your results. Have you tried this recipe? Tag us on Pinterest! Share your photos and stories with us. Happy cooking!
—Emma Caldwell.


Leave a Reply