

The Day I Burned the Biscuits (and Learned Something)
The first time I made cheesecake bars, I was twelve years old. My grandmother stood behind me, telling me to push the crumbs into the pan harder. I thought I knew better. I did not press hard enough, and the crust fell apart. I still laugh at that. It tasted good anyway, because food made with love always does. That is why I love this recipe. You cannot mess it up too badly. Even if your crust crumbles, you just call it a “rustic dessert.” Doesnt that sound fancy? I think so. Here is a question for you: What was the first thing you ever tried to bake all by yourself? I would love to hear about it.Why Raspberries and Lemons Are Best Friends
Raspberries are sweet and a little tart. Lemons are bright and zingy. When you put them together, they sing. It is like peanut butter and jelly, but for grown-ups. The lemon juice wakes up the raspberries. The zest adds tiny bursts of sunshine. Sometimes I eat a raspberry right from the bowl. I always save a few extra for the top. That way, when you slice into the bars, you see those pretty red jewels. Why this matters: Fresh fruit is good for you, but it also makes your food look like art. You eat with your eyes first. I have a tiny poll for you. Which fruit do you think tastes best in cheesecake? Strawberry, blueberry, or raspberry? Tell me your vote.The Secret Ingredient You Might Not Expect
This recipe has something called soy protein crisps in the crust. You might know them as the little crunchy bits inside some cereal bars. They add a pop of crunch. If you do not have them, you can just use an extra biscuit or some oats. I have done that many times. Here is the fun part. The base also has milk and butter. You melt them together and mix them into the crumbs. It smells like warm cookies. I always lick the spoon. Dont tell anyone. *Fun fact: Digestive biscuits were first made in Scotland in 1839. They were called “digestive” because they had baking soda, which was thought to help your tummy.* Why this matters: Your crust is the foundation of your bar. If it is weak, everything falls apart. Take your time pressing it down. Use the bottom of a cup. It makes a big difference.How to Know When It Is Done (Without Guessing)
Baking can feel like a mystery. You put a pan in the oven and hope for the best. But there is a trick. When the edges of the cheesecake look set, but the center still jiggles a little, it is ready. That little wobble means it will be creamy. I remember pulling my first cheesecake out too early. It was like soup. The next time, I waited too long. It was like rubber. The third time, I got it just right. The center moved like a happy belly laugh. That is the sweet spot. Here is a question for you: Have you ever had a baking fail that turned into a funny story? I would love to know.The Part Where Patience Pays Off
After you bake these bars, you have to wait. That is the hardest part. You let them cool on the counter for thirty minutes. Then you put them in the fridge for at least five hours. Overnight is even better. I know. It feels like forever. But trust me. That wait is what makes them perfect. The filling gets firm. The flavors melt together. The lemon and raspberry become one. If you slice them too soon, they will be a mess. Patience is a kind of love. Why this matters: Good things take time. That is true for food and for life. You cannot rush a cheesecake, and you should not rush a good memory.The Lovely Last Layer of Raspberry
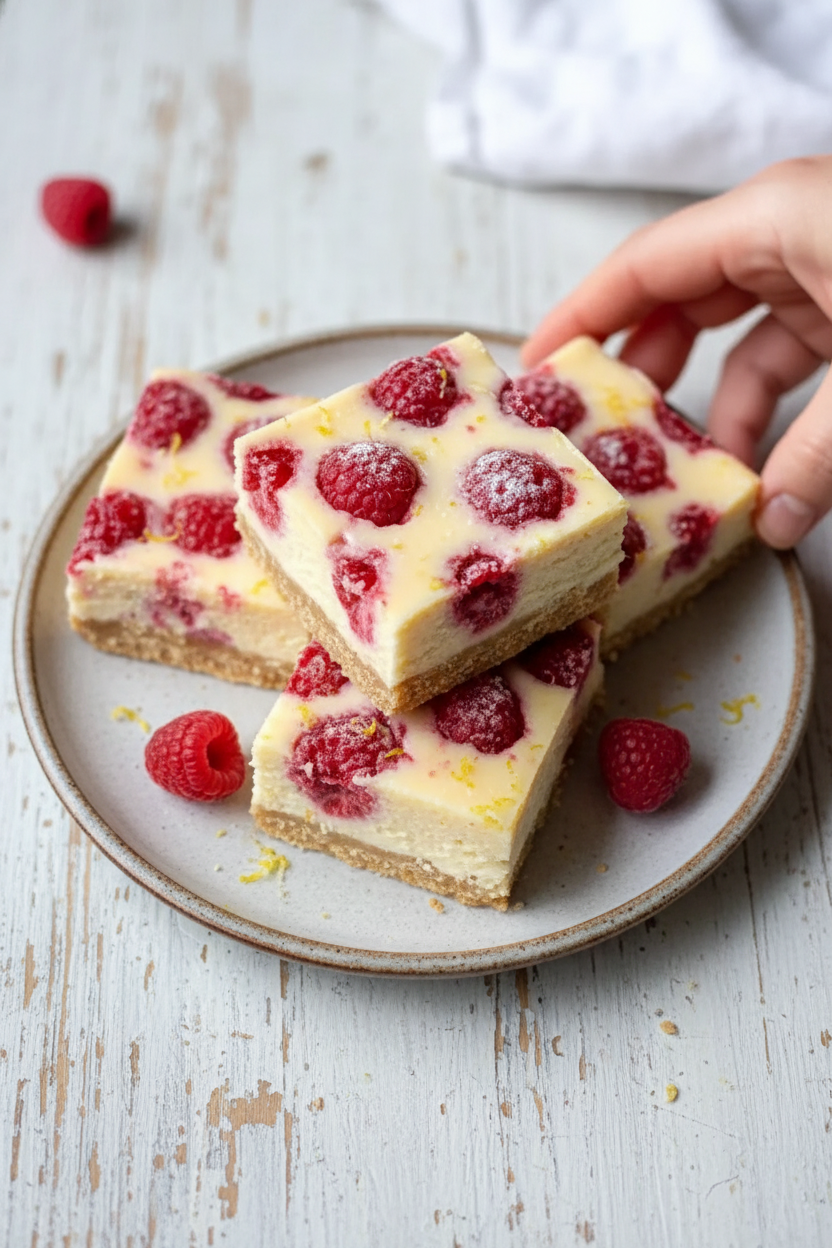
When you pour the filling into the pan, you layer it with raspberries. A layer of berries, then half the filling. Then more berries, then the rest of the filling. Then you dot the top with a few extra raspberries. It looks like a hidden treasure map. Every bite has a little surprise. Some bites are smooth and creamy. Other bites burst with berry juice. It keeps your mouth happy. I like to save a bite with a raspberry on top for last. That is my favorite moment. I have one more question for you. Do you like your desserts very sweet, or just a little sweet? This recipe uses a gentle sweetness. You can always add more sugar if you like it sweeter.Sharing Is the Best Part
These bars are perfect for a picnic, a potluck, or just a quiet afternoon. You can slice them into twelve pieces. That gives you plenty to share. Or you can keep them all for yourself. I will not judge. I once brought these bars to a family dinner. My little nephew ate three pieces. Then he asked for the recipe. He was seven. That made me laugh so hard. Now he makes them with his mom. That is why I love cooking. It passes from one person to the next. I will leave you with this. Take a picture of your bars. Share them with someone you love. Food tastes better when you eat it together.Ingredients:
| Ingredient | Amount | Notes |
|---|---|---|
| Biscuits (Digestive or Graham crackers) | 8 biscuits | Graham crackers work too |
| Soy protein crisps | 3 tbsp | Sub 1 extra biscuit or oats |
| Light butter | 2 tbsp | Regular butter or coconut oil |
| Milk | 1 tbsp | Any type works |
| Light cream cheese | 8 oz | Room temperature |
| Greek yogurt | 1.5 cups | Vanilla or plain |
| Large eggs | 2 | Room temperature |
| Granulated sweetener | 0.5 cup | Erythritol, stevia, or sugar |
| Vanilla protein powder | 0.5 cup | Or cornstarch/flour |
| Vanilla extract | 2 tsp | Pure extract preferred |
| Lemon (juice) | 1 lemon | Freshly squeezed |
| Lemon (zest) | 1 lemon | Organic preferred |
| Fresh raspberries | 1 cup | Plus extra for topping |
Memories in Every Bite: My Raspberry Cheesecake Bars
My kitchen smells like summer today. I still remember the first time I made these bars for my granddaughter Lily. She took one bite and her eyes got so wide. “Grandma, this is healthy?” she whispered. I just smiled and nodded. Doesn’t that smell amazing already?
These bars remind me of the old cheesecake my mother used to make on Sundays. But this one is lighter, with yogurt and fresh berries. You won’t miss the heavy cream at all. Let me walk you through it like we are baking together in my sunny kitchen. Just you and me, a spoon, and a big bowl.
Step 1: Preheat your oven to 320°F (160°C). Line a 9×9-inch baking pan with parchment paper, leaving some hanging over the edges. This makes lifting the bars out so easy later. My friend Judy once forgot the parchment and ended up eating crumbs from a spoon. We still laugh at that.
Step 2: Put 8 digestive biscuits and 3 tablespoons of soy protein crisps in a food processor. Pulse until they look like fine sand. If you don’t have protein crisps, just use one extra biscuit or some rolled oats. Melt 2 tablespoons of light butter with 1 tablespoon of milk, then stir into the crumbs.
Step 3: Press the crumb mixture firmly into your pan. Use the bottom of a flat cup to get it even. Bake for 10 minutes, then set it aside to cool completely. (Hard-learned tip: Don’t skip cooling the base—warm crust will melt your filling into a gooey mess. I learned that the hard way during a rainy Tuesday bake-off!)
Step 4: In a large bowl, mix 8 ounces of light cream cheese (make sure it’s room temperature) with 1.5 cups of Greek yogurt. Add 2 eggs, half a cup of sweetener, half a cup of vanilla protein powder, 2 teaspoons of vanilla extract, and the juice and zest of one lemon. Whisk until it’s smooth and creamy, like soft clouds.
Step 5: Now comes the fun part—layering. Scatter one-third of your fresh raspberries over the cooled base. Pour half the filling over them. Repeat with another layer of berries, then the rest of the filling. Finish with the remaining raspberries on top. I like to push a few gently into the batter so they peek out like little jewels. What is your favorite berry to bake with? Share below!
Step 6: For a silky texture, place your pan inside a larger roasting pan and pour in about an inch of hot water. This gentle water bath keeps the cheesecake from cracking. Bake for 30 to 40 minutes. The edges should look set, but the center should jiggle like a happy pudding. Cool on the counter for 30 minutes, then chill for at least 5 hours or overnight.
Step 7: Use the parchment overhang to lift the whole block out of the pan. Slice into 12 even bars using a sharp knife wiped clean between cuts. Serve them cold, right from the fridge. My neighbor Frank eats two in one sitting and claims it’s still “eating healthy.” I just wink and hand him another napkin.
Cook Time: 30–40 minutes
Total Time: 5 hours 30 minutes (includes chilling)
Yield: 12 bars
Category: Dessert, Snack
Three Twists to Make Them Your Own
Baking is like telling a story. You can change the ending anytime you want. Here are three fun ways to switch up these bars. I hope you try one and tell me how it goes.
Chocolate Dream: Swap the raspberries for chopped dark chocolate and add a tablespoon of cocoa powder to the filling. It tastes like a hidden brownie hug.
Zesty Lemon-Lavender: Skip the raspberries and double the lemon zest. Stir in a teaspoon of dried lavender buds for a fancy garden feel. Your kitchen will smell like a spring day.
Peanut Butter Swirl: Warm up a quarter cup of peanut butter and drizzle it over the top before baking. Swirl it gently with a knife for marbled stripes. Which one would you try first? Comment below!
How I Like to Serve These Bars
These bars are perfect right out of the fridge. But if you want to dress them up a little, try a few of my favorite tricks. A tiny dollop of whipped cream on top feels fancy. A handful of fresh mint leaves makes the plate pretty. You can also dust them lightly with powdered sweetener for a snowy look.
For drinks, I love a tall glass of cold almond milk with these bars. It’s creamy and gentle. If it’s a grown-up evening, a small glass of crisp white wine like Sauvignon Blanc pairs beautifully with the tart lemon. Which would you choose tonight?
Storing Your Raspberry Cheesecake Bars
These bars keep beautifully in the fridge for up to five days. Just cover them tight with plastic wrap or pop them in a sealed container. I remember making a double batch for my daughter’s school bake sale, and we snacked on leftovers all week long. The flavor gets even better the second day. For longer storage, freeze them for up to three months. Wrap each bar in plastic wrap, then put them all in a zip-top bag. Thaw in the fridge overnight before serving. Have you ever tried storing it this way? Share below! This matters because a big batch saves you time on busy days. You always have a healthy treat ready when a sweet craving hits.
Three Common Problems and Easy Fixes
First, your cheesecake filling might crack on top. That happens if you overmix the batter. Just stir gently until everything comes together, no more. I once beat mine too hard and ended up with a canyon running through the middle. Second, the base can get soggy. Make sure you bake the crust for a full ten minutes before adding the filling. That little step locks in the crunch. Third, the bars might stick to the pan if you skip the parchment paper. Always leave an overhang on two sides for easy lifting. This matters because fixing these small mistakes builds your cooking confidence. You learn trust your kitchen instincts. Which of these problems have you run into before?
I remember the first time I made these, I forgot to let the cream cheese come to room temperature. The filling turned out lumpy and sad. Now I always set it on the counter an hour before I start. That simple trick makes your bars silky smooth every time. *Fun fact: room-temperature eggs also blend more evenly into the batter, giving you a creamier texture.* It is the little details that turn a good bar into a great one.
Your Questions Answered
Q: Can I make these gluten-free? A: Yes. Use gluten-free graham crackers or oat-based biscuits for the base.
Q: How far ahead can I make them? A: You can bake these bars up to two days before serving. They taste best after a full night in the fridge.
Q: Can I swap the Greek yogurt? A: Sure. Use plain skyr or a thick coconut yogurt for a dairy-free option.
Q: What if I only have frozen raspberries? A: Use them straight from the freezer. Do not thaw first, or they will turn mushy.
Q: Can I double the recipe? A: Yes. Bake it in a 9×13-inch pan and add ten minutes to the baking time. Which tip will you try first?
A Warm Send-Off
I hope these bars bring a little sweetness to your table. They are simple, healthy, and full of bright raspberry flavor. My own grandkids love helping me press the crust into the pan. It makes the whole kitchen smell like lemon and vanilla. Have you tried this recipe? Tag us on Pinterest! I love seeing your beautiful creations. Thank you for spending time in my kitchen today. Happy cooking!
—Emma Caldwell.

Healthy Raspberry Cheesecake Bars: Healthy Raspberry Cheesecake Bars Recipe
Description
Healthy raspberry cheesecake bars made with simple ingredients for a guilt-free dessert. Creamy, fruity, and deliciously low calorie.
Ingredients
Instructions
- Preheat oven to 320°F (160°C) and line 9×9-inch pan with parchment paper. Pulse digestive biscuits and soy protein crisps in a food processor until fine. Melt butter with milk and mix into crumbs. Press crumb mixture into pan and bake for 10 minutes. Let cool.
- Mix cream cheese, Greek yogurt, eggs, sweetener, protein powder, vanilla, lemon juice, and zest until smooth. Layer one-third raspberries on base, pour half filling over, repeat layers, finishing with remaining raspberries. Optional: Place pan in larger roasting pan with 1-inch water for gentle water bath. Bake 30-40 minutes until edges set and center slightly wobbly. Cool on counter 30 minutes, then chill at least 5 hours. Use parchment overhang to lift bars, slice into 12 pieces, and serve cold.


Leave a Reply